Introduction to Rotary Evaporators
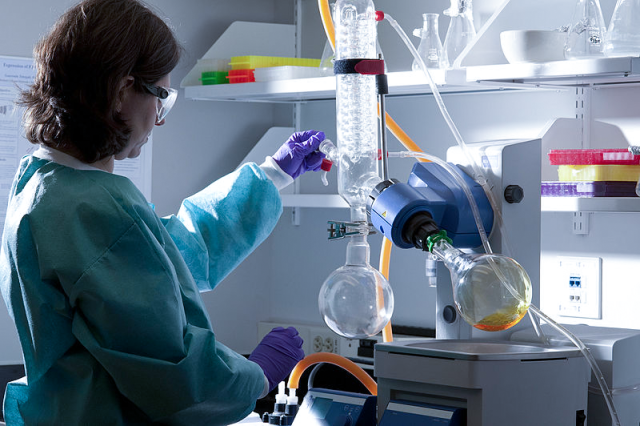
Rotary evaporators, also known as rotovaps, are commonly used in chemical labs for the efficient and gentle removal of solvents from samples by evaporation. The device consists of a motor-driven rotating flask that is heated by a water or oil bath, allowing for the evaporation of the solvent. The vapor is then condensed and collected in a separate flask, leaving the sample behind. Rotary evaporators are popular because they can handle a large volume of samples, and they are easy to use and maintain. However, they also require proper safety precautions and techniques to prevent accidents and achieve optimal results.
Table of Contents
- Introduction to Rotary Evaporators
- Safety Precautions
- Setting Up a Rotary Evaporator
- Step 1: Assemble the Apparatus
- Step 2: Attach the Glassware and Connect Vacuum and Water Source
- Step 3: Fill the Flask with the Sample and Solvent
- Step 4: Turn on the Water Bath and Adjust the Temperature
- Step 5: Turn on the Vacuum Pump and Lower the Flask
- Step 6: Remove the Flask and Detach the Glassware
- How to Halt a Rotary Evaporation
- Conclusion: Mastering Rotary Evaporators
Safety Precautions
When working with a rotary evaporator, it is essential to observe safety precautions to prevent accidents such as chemical burns, fires, and explosions. Here are some crucial safety measures to take when using a rotary evaporator:
Personal Protective Equipment
Always wear personal protective equipment (PPE) such as gloves, goggles, and lab coats when using a rotary evaporator. This gear will protect you from any chemical splashes or spills that may occur during the distillation process.

Check the Equipment
Before starting, ensure that the equipment is in good working condition and that there are no leaks or damages. Make sure that all the parts are properly secured to prevent accidents such as spills and breakages.
Compatible Solvents and Chemicals
Only use solvents and chemicals that are compatible with the instrument. Using incompatible solvents and chemicals can damage the machine or cause it to malfunction, leading to accidents.
Maximum Flask Capacity
Never exceed the maximum capacity of the flask. Overloading the flask can cause spills and accidents, leading to injuries, and damage to the equipment.
Secure the Flask and Condenser
Always secure the flask and condenser correctly to prevent spills and accidents. You may use a Keck clip to secure the flask and a splash shield or protection shield to enclose the evaporating flask and prevent possible contamination and injuries from splashes.
Monitor the Process Closely
It is important to monitor the process closely and be aware of any unusual activity or changes in temperature or pressure. If you notice any changes, stop the process immediately and investigate the cause of the problem.
Emergency Precautions
In case of any emergency, know the location of the emergency shower, eyewash station, and fire extinguisher. These are essential tools that can help you handle an emergency in case of an accident.
In summary, using a rotary evaporator requires strict adherence to safety precautions to ensure safety in the laboratory. Always wear PPE, check the equipment, use compatible solvents and chemicals, don't exceed the maximum flask capacity, secure the flask and condenser and monitor the process closely. In case of emergencies, know the location of the emergency shower, eyewash station, and fire extinguisher.
Setting Up a Rotary Evaporator
Setting up a rotary evaporator is a crucial step in using this equipment effectively. Here are the key steps to follow:
Step 1: Assemble the Apparatus
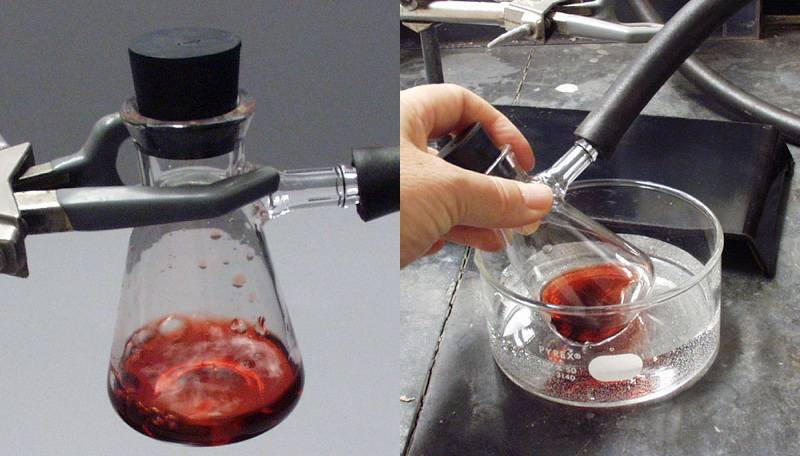
Before assembling the apparatus, ensure that your round bottom flask is double the volume of your sample. You should also elevate your vacuum pump to ensure that it is above the traps, which will aid in keeping your solvent out of your pump.
Next, hook up your tube and label it in and out on your dry ice trap. Add a closing and opening valve in between the vacuum pump and the last trap to aid in removing solvent from your trap. For the vacuum to be strong, ensure the inside of your tubing is large enough. Usually, the recommended tubing size is 3/16 inch wall thickness by 5/16 inch interior diameter. Dry ice is essential for maintaining a cold atmosphere and condensing the solvent.
Step 2: Attach the Glassware and Connect Vacuum and Water Source
Use glycerin in wetting your glass when using glass as a part of your connection in the side-arm flask. Moreover, put on gloves to protect your hand and hold your glass next to the pressure point as you put the vacuum tube on. Ensure that your dry ice’s temperature is -78.5 degrees Celsius.
Step 3: Fill the Flask with the Sample and Solvent
Add your sample to a round-bottomed flask. The RB flask should not be more than half full with liquid. Attach the round-bottom flask to the ground glass joint of the bump trap at the end of the distillation tube. Ensure that all glassware is held securely in place with a plastic Keck clip and/or ring cap.
Step 4: Turn on the Water Bath and Adjust the Temperature
Turn on the water bath and adjust the temperature to the desired level. Ensure that both the aspirator pump and the recirculating water bath (5 gallon bucket) are filled with ice. Check that the power strip is turned on and plugged in. Verify that the bump trap is clean and dry.
Step 5: Turn on the Vacuum Pump and Lower the Flask
Turn on the vacuum pump and slowly lower the flask into the water bath. As the solvent evaporates, it will be condensed and collected in the receiving flask. It is important to monitor the process and adjust the temperature and vacuum levels as needed.
Step 6: Remove the Flask and Detach the Glassware
When the process is complete, turn off the vacuum pump and remove the flask from the water bath. Finally, detach the glassware and clean it thoroughly before storing it.
In conclusion, setting up a rotary evaporator may seem daunting at first. However, by following these simple steps, anyone can set up and use a rotary evaporator like a pro.
How to Halt a Rotary Evaporation
When using a rotary evaporator, it is essential to know how to halt the process safely. Here are the steps to follow:
Step 1: Remove the Flask from the Heat Bath
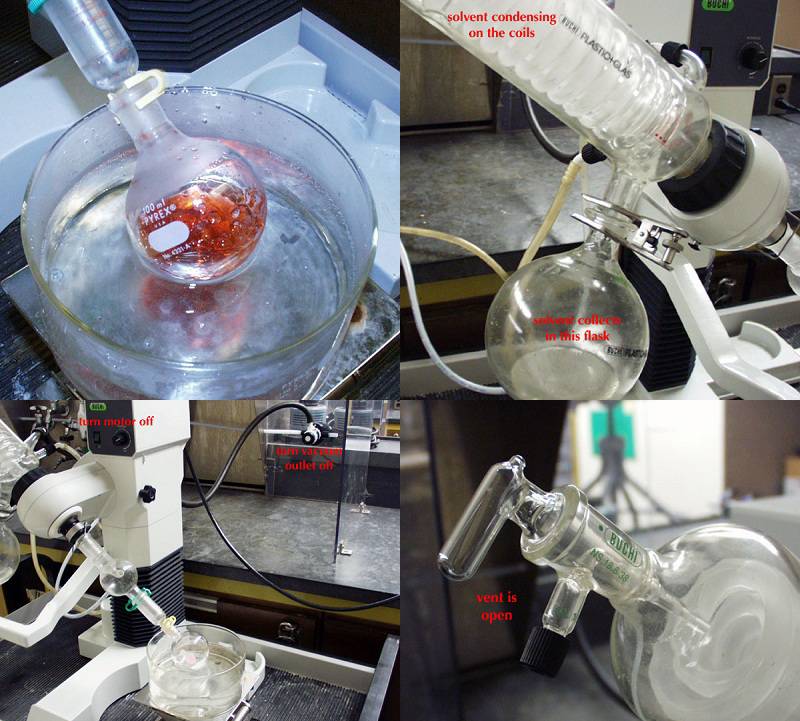
The first step in halting a rotary evaporation is to remove the flask from the heat bath. Ensure that you handle the flask gently to avoid damaging the glassware or spilling the contents.
Step 2: Open the Stopcock
Next, open the stopcock to release the vacuum. This will prevent any liquid from being sucked into the pump.
Step 3: Halt the Rotor
Halt the rotor to stop the spinning of the flask. This will prevent any mishap from happening.
Step 4: Turn Off the Vacuum/Aspirator
After stopping the rotor, turn off the vacuum or aspirator. This will stop the flow of air and prevent any further evaporation.
Step 5: Disconnect the Flask
Disconnect the flask from the rotary evaporator. Grasp it firmly and twist it slightly to break the seal.
Step 6: Drop Flask in Heat Bath
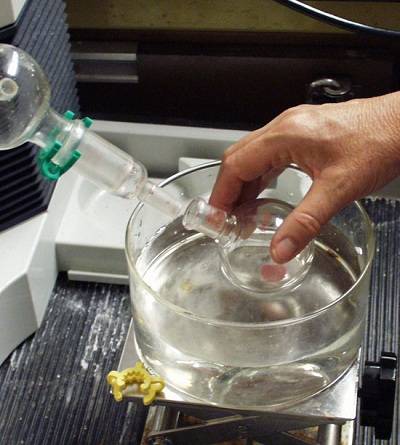
Gently drop the flask in the heat bath, ensuring that it is placed on a heat-resistant surface. This will prevent any thermal shock from occurring.
It is important to follow these steps in the correct order to avoid any mishaps. Not following the proper procedure may result in filling the rotary evaporator with tap water or bulk transport of your sample into the deepest recesses of the rotary evaporator.
In conclusion, by following the above steps, anyone can use a rotary evaporator like a pro and safely halt the process without any mishap.
Conclusion: Mastering Rotary Evaporators
In conclusion, mastering the use of rotary evaporators is essential in any laboratory setting. It is important to follow safety precautions and properly set up and use the machine to ensure accurate and efficient results. Tips for operating a rotary evaporator include adjusting the temperature, monitoring the vacuum, and controlling the rotation speed. When halting a rotary evaporation, it is important to turn off the vacuum and lower the bath temperature gradually. By following these steps, you can become a pro at using a rotary evaporator and achieve successful distillations every time.
