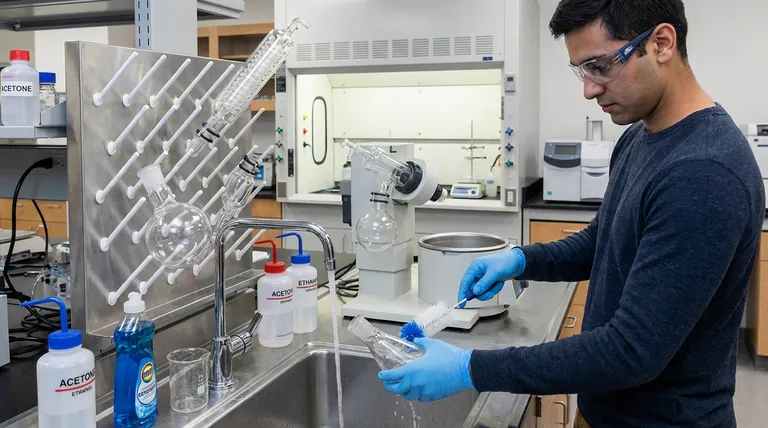
To properly clean a Rotovap, the core process involves disassembling the primary glassware, washing each component with a solvent that dissolves the residue, performing a final rinse with a volatile, high-purity solvent like acetone, and allowing the parts to dry completely. This ensures the removal of contaminants that could compromise your next sample.
The goal of cleaning a rotary evaporator isn't just to make it look clean; it's to achieve analytical purity. The key is to select a cleaning method based on the chemical nature of the contaminant you're trying to remove, ensuring the integrity of both your equipment and your future results.
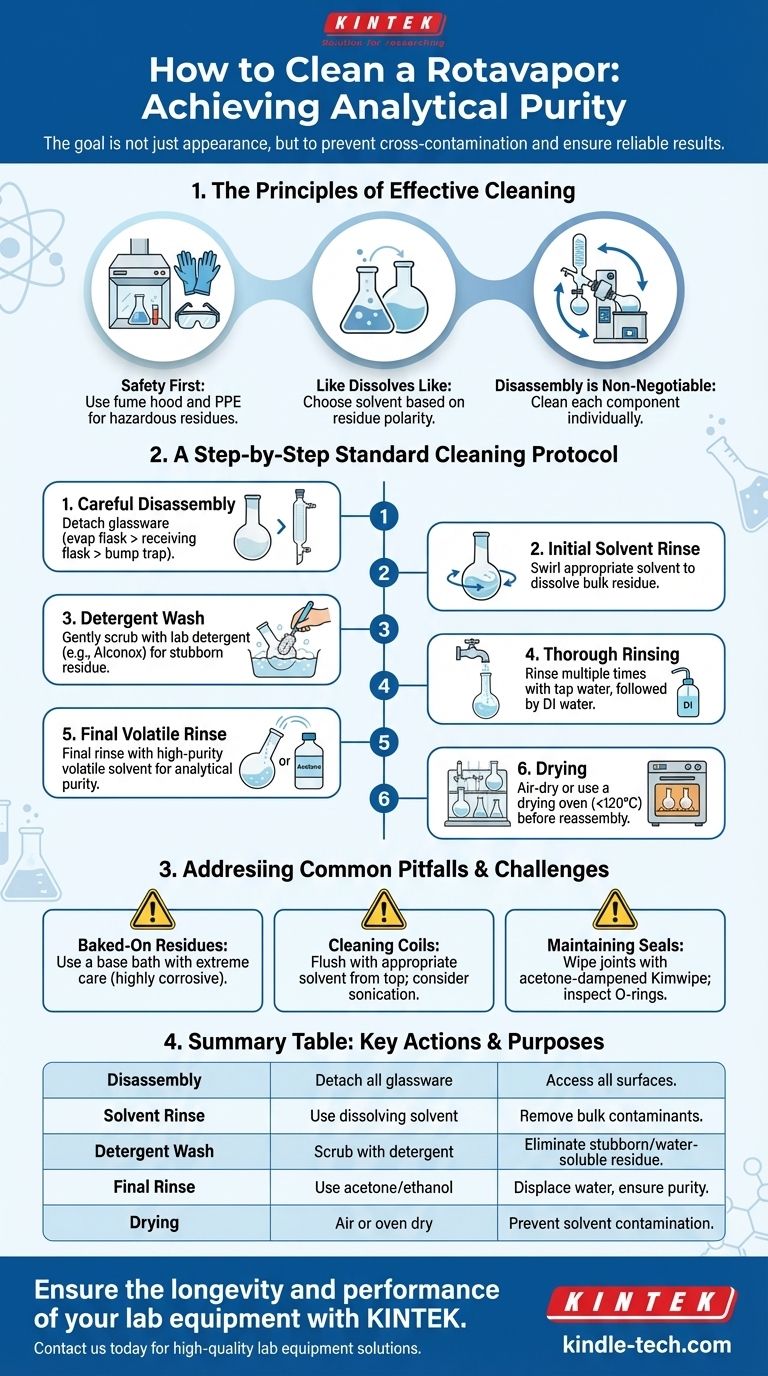
The Principles of Effective Rotovap Cleaning
Proper cleaning is a foundational lab practice that protects expensive equipment and prevents cross-contamination between experiments. It's a process guided by chemical principles and a respect for safety.
Safety is the First Step
Before any disassembly, consider the nature of the material you just evaporated. If the residue is toxic, corrosive, or otherwise hazardous, all cleaning should be performed in a fume hood while wearing appropriate personal protective equipment (PPE), including gloves and safety glasses.
The "Like Dissolves Like" Rule
The most effective cleaning agent is a solvent that readily dissolves the residue left in the flask. Often, the best first choice is the same solvent you just removed during evaporation. If that is insufficient, choose a solvent with a similar polarity to your compound.
Why Disassembly is Non-Negotiable
Simply rinsing the assembled apparatus is inadequate. Contaminants accumulate in the bump trap, on the condenser coils, and within the ground glass joints. Each component must be cleaned individually to ensure a truly pure system.
A Step-by-Step Standard Cleaning Protocol
This procedure applies to routine cleaning for most common organic compounds and solvents.
Step 1: Careful Disassembly
First, safely vent the system and turn off the rotation and heat. Carefully detach the glassware components in this order: the evaporating flask, the receiving flask, and the bump trap from the condenser.
Step 2: The Initial Solvent Rinse
Pour a small amount of an appropriate solvent (see "Like Dissolves Like" above) into the evaporating flask. Swirl to dissolve the bulk of the residue and discard this into a designated waste container. Repeat for the receiving flask if necessary.
Step 3: Detergent Wash
For more stubborn or water-soluble residues, use a laboratory-grade detergent like Alconox mixed with warm water. Use a soft-bristled flask brush to gently scrub the interior surfaces of the flasks. Never use an abrasive scrubber, which can scratch the glass.
Step 4: Thorough Rinsing
Rinse each component multiple times with tap water, followed by a final rinse with deionized (DI) water to remove any detergent or mineral residue.
Step 5: The Final Volatile Rinse
Perform a final rinse with a high-purity, volatile solvent like acetone or reagent-grade ethanol. This displaces the water and any remaining organic contaminants, and because it evaporates quickly, it significantly speeds up drying.
Step 6: Drying
Allow the glassware to air-dry completely on a drying rack. For faster results, you can place the glassware in a drying oven, but do not exceed 120°C. Ensure all components are completely dry before reassembly to prevent solvent contamination.
Addressing Common Pitfalls and Challenges
Sometimes, a standard wash isn't enough. Understanding how to handle difficult situations protects the equipment and ensures a proper clean.
Stubborn or "Baked-On" Residues
If a compound has polymerized or was "baked" onto the flask, a more aggressive method may be needed. A base bath (a saturated solution of potassium hydroxide in isopropanol) is extremely effective but must be handled with extreme care and appropriate PPE, as it is highly corrosive.
Cleaning the Condenser Coils
The condenser can be tricky to clean internally. The most effective method is to flush it with an appropriate solvent (like acetone) from the top, allowing it to drain out into a beaker. For persistent residues, careful sonication in a cleaning bath can be effective.
Maintaining Seals and Joints
Residue on ground glass joints can prevent a strong vacuum seal. Gently wipe the joints with a kimwipe dampened with acetone. Inspect O-rings and rubber seals for degradation and replace them if they appear cracked or worn.
Making the Right Choice for Your Goal
Your cleaning strategy should match the sensitivity of your work and the nature of your samples.
- If your primary focus is analytical purity for trace analysis: Always perform a final rinse with high-purity acetone or the solvent you will use in your next step, and visually inspect for any residue before use.
- If you are working with routine, non-sensitive compounds: A standard protocol of solvent wash, detergent, and DI water rinse is typically sufficient.
- If you encounter a stubborn, unknown residue: Begin with the least aggressive solvent (water, ethanol, acetone) and only escalate to more aggressive methods like a base bath as a last resort, always prioritizing safety.
Ultimately, diligent and appropriate cleaning is a critical, non-negotiable part of achieving reliable and repeatable scientific results.
Summary Table:
| Cleaning Step | Key Action | Purpose |
|---|---|---|
| 1. Disassembly | Detach evaporating flask, receiving flask, and bump trap. | Access all surfaces for thorough cleaning. |
| 2. Solvent Rinse | Use a solvent that dissolves the residue (e.g., acetone). | Remove bulk contaminants. |
| 3. Detergent Wash | Scrub with lab-grade detergent and warm water. | Eliminate stubborn or water-soluble residues. |
| 4. Final Rinse | Rinse with high-purity, volatile solvent (e.g., acetone). | Displace water and ensure analytical purity. |
| 5. Drying | Air-dry or use a drying oven (<120°C). | Prevent solvent contamination in next use. |
Ensure the longevity and performance of your lab equipment with KINTEK. Proper cleaning is essential, but starting with the right equipment is just as critical. KINTEK specializes in high-quality lab equipment and consumables, including rotary evaporators designed for easy maintenance and reliable operation. Our products are trusted by laboratories worldwide for their durability and precision. Contact us today to find the perfect solution for your laboratory needs and let us help you achieve consistent, contamination-free results. Reach out to our experts now!
Visual Guide
Related Products
- Electric Rotary Kiln Small Rotary Furnace for Activated Carbon Regeneration
- Inclined Rotary Plasma Enhanced Chemical Vapor Deposition PECVD Equipment Tube Furnace Machine
- Electric Rotary Kiln Small Rotary Furnace Biomass Pyrolysis Plant
- Inclined Rotary Plasma Enhanced Chemical Vapor Deposition PECVD Equipment Tube Furnace Machine
- Laboratory Vacuum Tilt Rotary Tube Furnace Rotating Tube Furnace
People Also Ask
- What are the characteristics of the slipping, slumping, and rolling modes of bed motion? Optimize Your Rotary Process
- What is the temperature of activated carbon regeneration? Unlock the 1000°F Process for Reuse
- What is a rotary kiln electric furnace? Achieve Superior Uniform Heating for Your Materials
- What is the regeneration temperature of activated carbon? Optimize Your Process with the Right Method
- What is the temperature of a rotating kiln? It Depends on Your Material and Process Goal