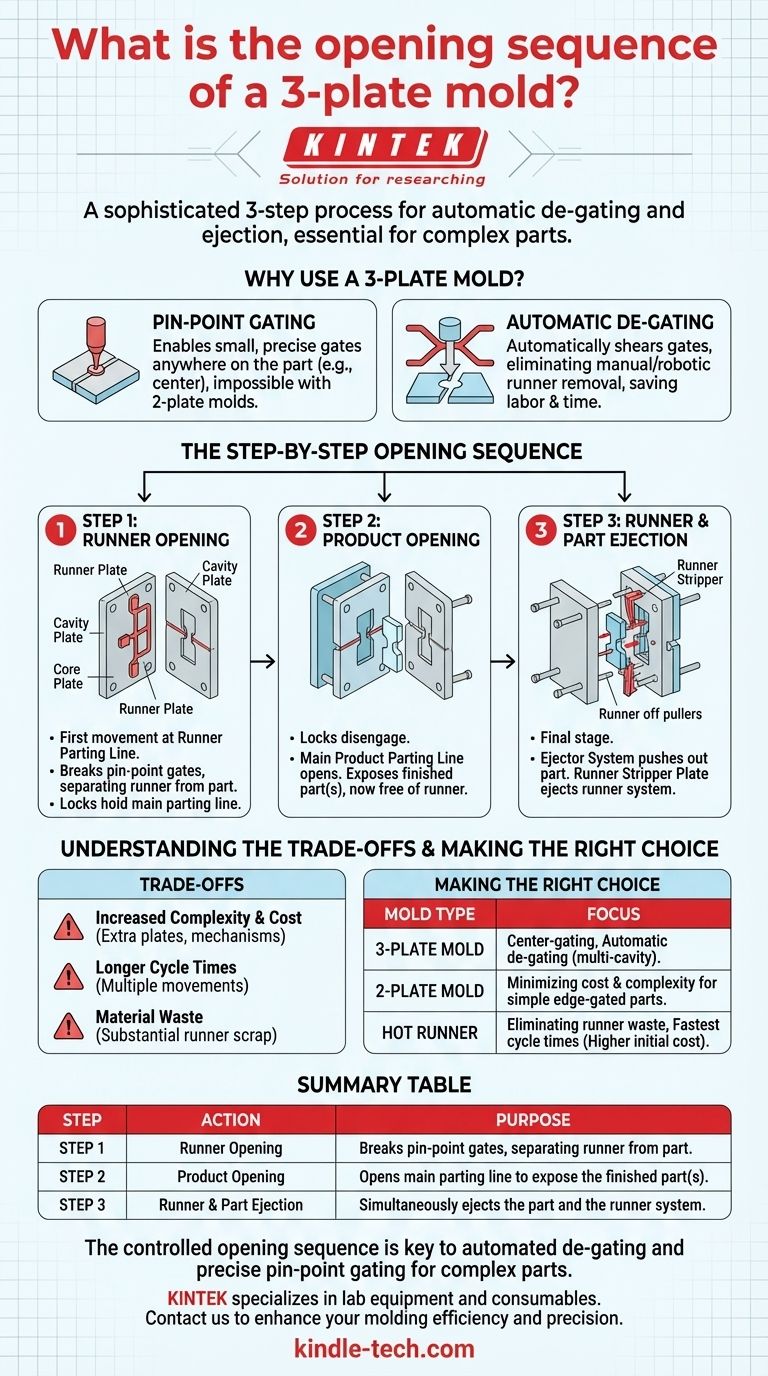
The opening sequence of a 3-plate mold involves three distinct movements designed to first separate the part from the runner system and then eject both. This sequence begins with an initial opening at the runner parting line, followed by the main product opening, and concludes with the ejection of the runner itself.
A 3-plate mold’s sophisticated opening sequence is its core advantage. It is engineered specifically to automate the separation of the runner from the finished part, a process known as automatic de-gating, which is essential for certain part designs and multi-cavity layouts.
Why Use a 3-Plate Mold?
Before detailing the sequence, it's critical to understand the purpose of this design. Unlike a simpler 2-plate mold, a 3-plate mold is chosen when the part requires a specific type of gate that a 2-plate mold cannot easily accommodate.
The Advantage of Pin-Point Gating
The primary reason is to enable the use of pin-point gates. These small, precise gates can be positioned almost anywhere on the part's surface, including the center, which is impossible with a standard edge-gated 2-plate mold.
The Goal of Automatic De-gating
This design automatically breaks or "shears" the small pin-point gates from the part during the opening sequence. This eliminates the need for a secondary manual or robotic operation to remove the runner, reducing labor costs and cycle time.
The Step-by-Step Opening Sequence
The controlled sequence is the defining characteristic of a 3-plate mold. It is typically controlled by components like latch locks, puller bolts, and limit straps to ensure each step happens in the correct order and for the correct distance.
Step 1: The Runner Opening
The first movement happens at the runner parting line, between the runner plate and the cavity plate.
As the press opens, locks hold the main parting line together, forcing this initial separation. This action pulls the solidified plastic in the tiny pin-point gates, causing them to break cleanly away from the molded part.
Step 2: The Product Opening
Once the first opening reaches a preset distance, the locks disengage, and the main product parting line begins to open.
This is the separation between the cavity plate and the core plate. This movement exposes the finished part (or parts), which are now free of the runner system and ready for ejection.
Step 3: Runner and Part Ejection
The final stage involves two actions that can happen sequentially or simultaneously. The part is pushed out of the core side by the ejector system.
At the same time, the runner stripper plate moves forward to push the now-isolated runner system off the pullers, allowing it to fall freely.
Understanding the Trade-offs
While powerful, the 3-plate mold design is not a universal solution. Its benefits come with clear trade-offs that must be considered.
Increased Complexity and Cost
The addition of a third plate and the mechanisms required for the sequenced opening (latches, pullers, extra plates) makes the mold significantly more complex and expensive to design, manufacture, and maintain.
Longer Cycle Times
The multiple movements and longer overall stroke required to open all the parting lines and eject the runner can lead to slightly longer cycle times compared to a well-designed 2-plate mold.
Material Waste
The runner system in a 3-plate mold can be quite substantial, especially in multi-cavity tools. This runner is scrap material that must be reground or discarded, representing a material cost that a hot runner system would avoid.
Making the Right Choice for Your Project
Selecting the correct mold type is a critical decision based entirely on your project's specific goals for part quality, cost, and production volume.
- If your primary focus is center-gating a part or automating de-gating in a multi-cavity tool: A 3-plate mold is an excellent and cost-effective choice for achieving this.
- If your primary focus is minimizing tool cost and complexity for a simple edge-gated part: A standard 2-plate mold is the most direct and efficient solution.
- If your primary focus is eliminating runner waste and achieving the fastest possible cycle times: A hot runner system, despite its higher initial cost, is the superior technology.
Ultimately, understanding the controlled opening sequence of a 3-plate mold allows you to leverage its unique ability to automate production and improve part quality.
Summary Table:
| Step | Action | Purpose |
|---|---|---|
| Step 1 | Runner Opening | Breaks pin-point gates, separating runner from part. |
| Step 2 | Product Opening | Opens main parting line to expose the finished part(s). |
| Step 3 | Runner & Part Ejection | Simultaneously ejects the part and the runner system. |
Optimize your injection molding process with the right equipment.
The controlled opening sequence of a 3-plate mold is key to achieving automated de-gating and precise pin-point gating for complex parts. Selecting the correct mold type is critical for your project's success in terms of part quality, cost, and production volume.
KINTEK specializes in lab equipment and consumables, serving laboratory needs. Whether you are prototyping new molds or scaling production, having reliable equipment is fundamental. Let our expertise support your innovation.
Contact KINTEK today to discuss how our solutions can enhance your molding efficiency and precision.
Visual Guide