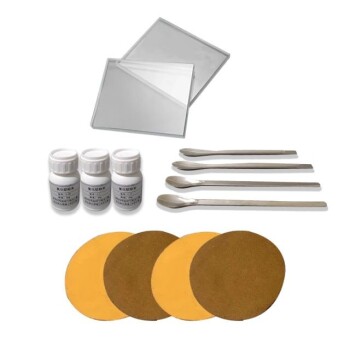
Proper preparation is the prerequisite for a uniform finish. To prepare the polishing cloth, peel away the protective backing and press the adhesive side firmly onto a clean, dry glass base, ensuring no air bubbles are trapped underneath. Before beginning the polishing process, prime the surface by sprinkling a small amount of alumina powder onto the cloth and moistening it with distilled water.
The integrity of your polishing surface relies on a secure, flat bond between the cloth and the glass. Combining a bubble-free application with a properly maintained alumina slurry ensures consistent material removal and prevents damage to the specimen.
Securing the Polishing Cloth
The physical application of the cloth establishes the geometry of your polishing surface. A poorly mounted cloth will lead to uneven results.
Preparing the Foundation
Ensure the glass base is completely clean and dry. Dust, debris, or residual moisture on the glass will prevent the adhesive from bonding correctly, potentially causing the cloth to shift during use.
Applying the Adhesive Layer
Remove the protective backing to expose the adhesive side of the polishing cloth. Handle the cloth carefully to avoid contaminating the adhesive before it touches the glass.
Eliminating Surface Irregularities
Press the cloth firmly onto the glass base. It is critical to smooth the material out completely to ensure no air bubbles are trapped between the cloth and the base, as bubbles create high spots that distort the polish.
Priming the Surface for Use
Once the cloth is mounted, it must be chemically and physically prepared to abrade the sample effectively.
Introducing the Abrasive
Sprinkle a small amount of the appropriate alumina powder onto the cloth. This powder provides the micro-cutting action necessary to polish the specimen.
Creating the Slurry
Moisten the cloth and powder with distilled water. This activates the abrasive, turning it into a slurry that lubricates the sample and facilitates smooth movement.
Common Pitfalls and Maintenance
Even a perfectly mounted cloth can fail if the environmental conditions change during the process.
The Danger of Drying Out
You must monitor the moisture level of the cloth constantly. If the cloth dries out, friction increases rapidly, which can overheat the sample or tear the cloth.
Restoring the Balance
If you observe the cloth drying during the polishing session, add more distilled water immediately. This restores the slurry's consistency and ensures the polishing action remains uniform.
Making the Right Choice for Your Goal
The preparation steps you take directly influence the quality of the final surface.
- If your primary focus is surface flatness: Prioritize the elimination of air bubbles during application to ensure the cloth is perfectly level.
- If your primary focus is surface finish quality: Focus on the ratio of alumina powder to distilled water, ensuring the cloth never runs dry.
A disciplined approach to cloth preparation eliminates variables, allowing you to focus entirely on the polishing technique itself.
Summary Table:
| Step | Action Item | Critical Success Factor |
|---|---|---|
| 1. Preparation | Clean & dry glass base | Ensures strong adhesive bond |
| 2. Mounting | Peel backing & press firmly | Zero air bubbles to prevent high spots |
| 3. Priming | Apply alumina powder | Provides necessary micro-cutting action |
| 4. Activation | Add distilled water | Creates lubricating slurry for smooth polish |
| 5. Maintenance | Monitor moisture levels | Prevents overheating or tearing of the cloth |
Elevate Your Material Preparation with KINTEK Precision
Achieving a perfect finish starts with the right tools and techniques. KINTEK specializes in high-quality laboratory equipment and consumables designed for the most demanding research environments. Whether you are preparing samples for microscopy or performing advanced material analysis, our expertise in crushing and milling systems, pellet presses, and specialized consumables like ceramics and PTFE products ensures you get reliable results every time.
From high-temperature furnaces to precision sample preparation tools, KINTEK is your partner in laboratory excellence. Contact us today to optimize your lab's performance!
Related Products
- Electrode Polishing Material for Electrochemical Experiments
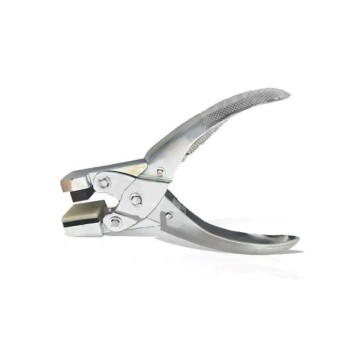
- Professional Cutting Tools for Carbon Paper Cloth Diaphragm Copper Aluminum Foil and More
People Also Ask
- What criteria are used during the visual inspection of electrodes? Essential Quality Assessment for Your Lab
- What is the general procedure and what precautions should be taken during the polishing process? Achieve a Flawless Electrode Finish
- How is a polished electrode tested for quality? Validate Performance with Cyclic Voltammetry
- What is the mechanism and purpose of using fine sandpaper for electrode grinding? Restore Peak Electrode Performance
- What is the purpose of using electrolytic polishing on copper foils? Optimize Your CVD Graphene & hBN Growth Surface