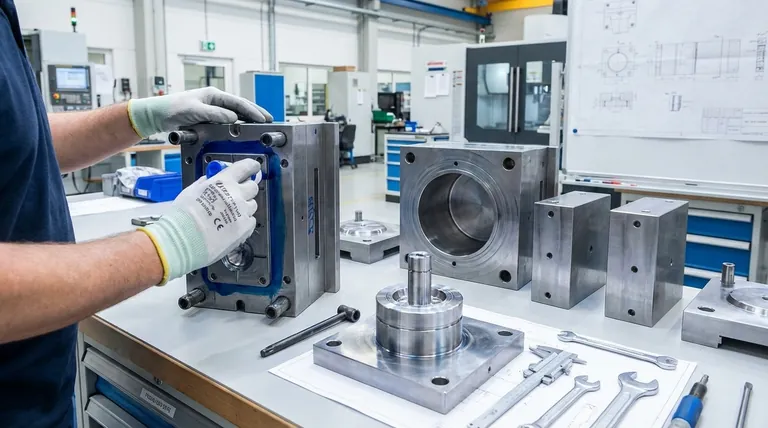
In short, mould assembly is the systematic process where all individual machined and purchased components—from core and cavity inserts to ejector pins and guide bushings—are meticulously fitted together to create a fully functional injection mould. This critical phase moves beyond simple construction; it is a comprehensive validation of the mould's design, machining accuracy, and operational readiness before it ever sees a moulding machine.
Mould assembly is not merely a mechanical task. It is the final, crucial quality control gate that transforms a collection of precision parts into a reliable, high-performance manufacturing tool, directly determining the quality of the final product and the longevity of the mould itself.
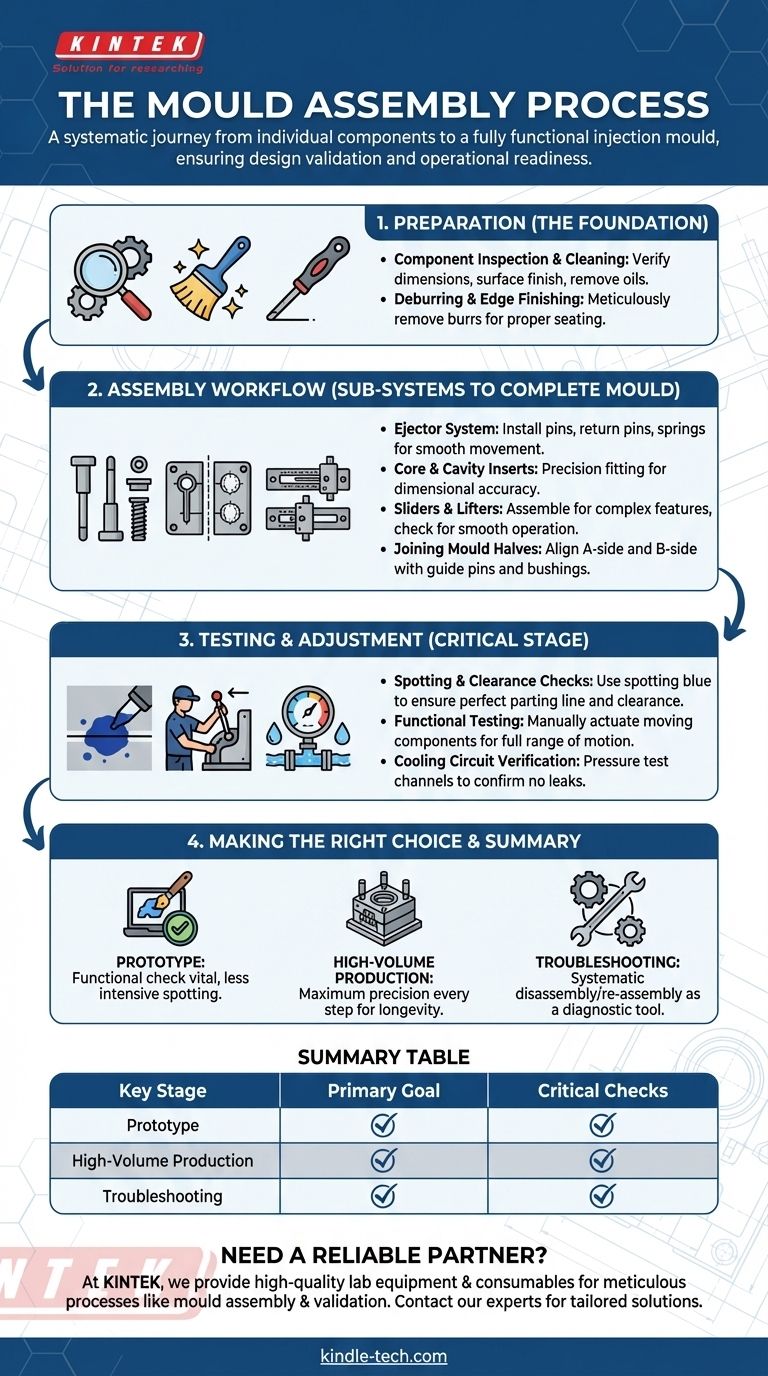
The Foundation: Preparation Before Assembly
Before any components are fitted together, a rigorous preparation phase is essential. Skipping this foundational step is the most common source of problems, leading to premature wear, part defects, and costly rework.
Component Inspection and Cleaning
Every single component, whether machined in-house or purchased, must be thoroughly inspected against its design drawing. This verifies dimensions, tolerances, and surface finishes. All parts must also be cleaned to remove protective coatings, machining oils, and any debris.
Deburring and Edge Finishing
Machining processes often leave sharp edges or small burrs on components. These must be meticulously removed by hand. A small burr can prevent parts from seating correctly, cause scoring on adjacent surfaces, and ultimately lead to premature mould failure.
The Assembly Workflow: From Sub-Systems to a Complete Mould
Assembly follows a logical sequence, typically building up the two halves of the mould (the fixed "A-side" and the moving "B-side") before bringing them together. This is a job that requires a comprehensive understanding of both mould structure and the injection moulding process.
Building the Ejector System
On the B-side of the mould, the ejector system is typically assembled first. This involves installing the ejector pins, return pins, and springs into the ejector plates. The entire system must move freely and evenly.
Installing Core and Cavity Inserts
The primary forming surfaces—the core and cavity inserts—are carefully fitted into their respective mould plates. Precision is paramount here, as their alignment dictates the final part's wall thickness and dimensional accuracy.
Assembling Sliders and Lifters
For parts with undercuts or complex features, mechanical sliders and lifters are required. These sub-assemblies are installed and checked to ensure they have smooth, non-binding movement. Their timing and interaction with other mould components are critical.
Joining the Mould Halves
Finally, the two complete mould halves are brought together. The guide pins and bushings, which ensure perfect alignment between the A and B sides, are installed and checked for a precise, smooth fit.
The Crucial Stage: Testing and Adjustment
Once the mould is fully assembled, it undergoes a series of manual tests to verify its function before being installed in a moulding press. This is an iterative process of testing, measuring, and making micro-adjustments.
Spotting and Clearance Checks
A thin layer of spotting blue (like Dykem's Prussian Blue) is applied to one surface, and the mould is closed. When opened, the transfer of blue ink reveals the exact points of contact. This ensures the parting line shuts off perfectly to prevent flash, and that there is adequate clearance for all moving parts.
Functional Testing
The technician will manually actuate all moving components. The ejector system is pushed forward to confirm all pins travel evenly and retract fully. Sliders and lifters are moved through their full range of motion to guarantee they operate without interference.
Cooling Circuit Verification
The cooling channels are connected to a pressure tester. This process confirms that there are no leaks in the circuits and that water or oil can flow freely, which is essential for managing cycle time and part quality during production.
Common Pitfalls to Avoid
Even experienced teams can encounter issues. Understanding these common pitfalls helps ensure a smooth and successful assembly process.
Rushing the Preparation Stage
The most frequent mistake is failing to properly clean and deburr every component. A single metal shaving or a small burr can cause catastrophic damage once the mould is under the immense pressure of clamping force.
Ignoring Small Misalignments
Assuming a small misalignment or tight spot will "wear in" is a costly error. These minor issues are symptoms of a larger problem and will rapidly escalate into significant wear, component failure, or defects like flash on the moulded part.
Inadequate Lubrication
Failing to apply the correct type and amount of lubricant to all moving components—such as guide pins, sliders, and leader pins—will cause friction, galling, and eventual seizure of the mould.
Making the Right Choice for Your Goal
The level of scrutiny during assembly should match the intended application of the mould.
- If your primary focus is a prototype or single-cavity mould: A thorough functional check is still vital, but the level of parting line spotting may be less intensive than for a production tool.
- If your primary focus is a high-volume, multi-cavity production mould: Every step, from deburring to clearance checks and functional testing, must be executed with maximum precision to ensure mould longevity and absolute part-to-part consistency.
- If you are troubleshooting an existing mould: A systematic disassembly and re-assembly, following this precise workflow, is a core diagnostic technique to find the root cause of part defects or operational failures.
Ultimately, a perfectly assembled mould is the final checkpoint that translates a sound design and accurate machining into a reliable and profitable manufacturing tool.
Summary Table:
| Key Stage | Primary Goal | Critical Checks |
|---|---|---|
| Preparation | Ensure all parts are clean, deburred, and meet specifications. | Dimensional accuracy, surface finish, absence of burrs. |
| Sub-Assembly | Build core/cavity inserts, ejector systems, and sliders. | Smooth movement, correct alignment, non-binding operation. |
| Final Assembly | Join mould halves and install alignment systems. | Perfect parting line shut-off, guide pin/bushing fit. |
| Testing & Adjustment | Validate function and performance before production. | Spotting checks, ejector system travel, cooling circuit integrity. |
Need a reliable partner for your moulding success? The precision and longevity of your injection moulds are paramount. At KINTEK, we specialize in providing the high-quality lab equipment and consumables that support meticulous processes like mould assembly and validation. From precision measurement tools to maintenance supplies, our products help ensure your moulds perform flawlessly. Let's discuss how we can support your laboratory's specific needs. Contact our experts today for a tailored solution.
Visual Guide
Related Products
- Assemble Square Lab Press Mold for Laboratory Applications
- Vacuum Hot Press Furnace Machine for Lamination and Heating
- Advanced Engineering Fine Ceramics Boron Nitride (BN) Ceramic Parts
- High-Purity Titanium Foil and Sheet for Industrial Applications
- Laboratory Grinding Mill Mortar Grinder for Sample Preparation
People Also Ask
- How long does it take to solder? A guide to timing and technique for perfect joints
- Is it fitting the mould or mold? A Guide to Correct Spelling by Region
- What is the lifespan of a mold? It's Immortal Unless You Control Moisture
- What are the parts of a press mold? A Guide to Punch, Die, and Key Components
- What is a press mold used for? Achieve Repeatable Precision and Efficiency