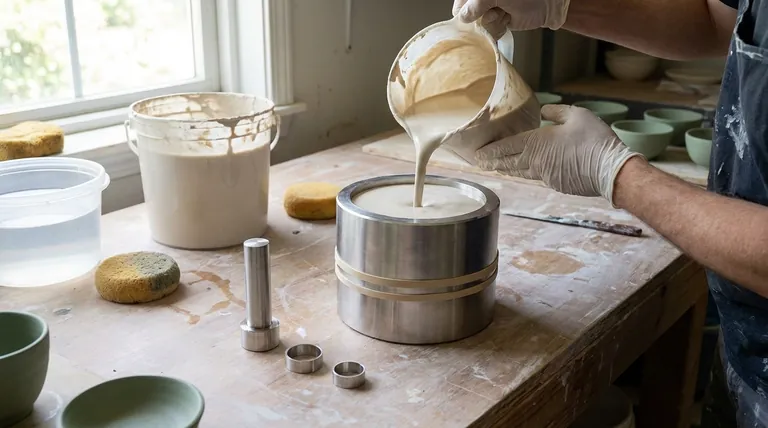
In short, using a ceramic casting mold is a process of securing the plaster mold pieces, filling the cavity with liquid clay (slip), and waiting for the plaster to absorb water from the slip, which forms a solid clay wall. Once the desired thickness is achieved, the excess slip is drained, and the piece is allowed to firm up before being carefully removed from the mold for finishing.
The key to successful slip casting is not just following the steps, but understanding the relationship between the two core materials: the porous plaster mold, which acts like a sponge, and the liquid slip, which provides the clay body. Your timing and control over this interaction dictate the quality of your final piece.
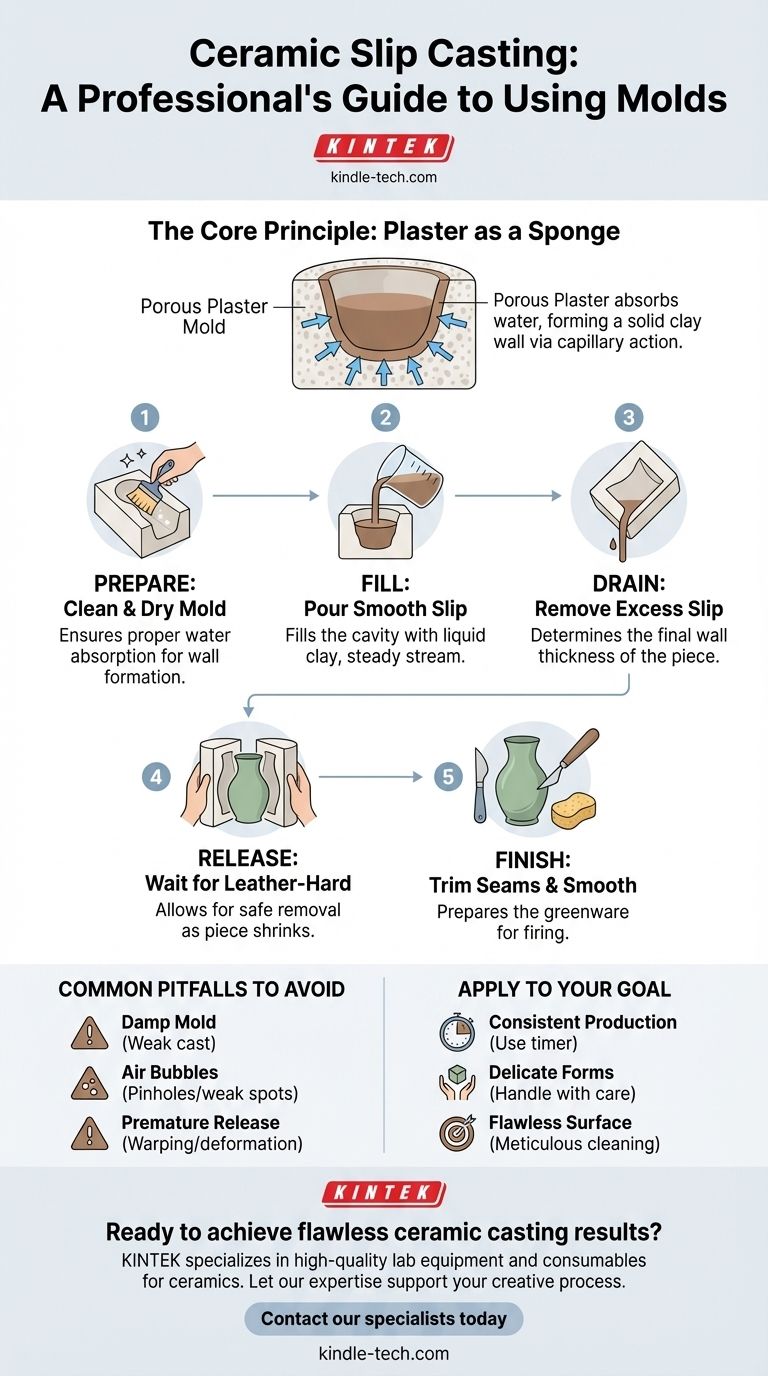
The Core Principle: How Slip Casting Works
Before walking through the steps, it's critical to understand why this process is effective. The entire method is built on a simple principle of water absorption.
The Role of the Plaster Mold
A plaster mold is a negative space of the form you want to create. Its most important property is its porosity.
When you pour liquid slip into the dry plaster mold, the plaster immediately begins to pull water out of the slip where it makes contact. This is a physical process known as capillary action.
The Formation of the Clay Wall
As water is drawn from the slip into the mold, the clay particles in the slip are left behind. They begin to deposit against the interior surface of the mold.
This layer of deposited clay becomes the wall of your piece. The longer you leave the slip in the mold, the more water is absorbed, and the thicker this clay wall becomes.
The Step-by-Step Casting Process
With the core principle in mind, the practical steps become much more intuitive. Each action is designed to control the interaction between the plaster and the slip.
Step 1: Prepare Your Mold and Slip
Your mold must be completely clean and dry. Any dust or debris inside will transfer to your piece, and a damp mold will not absorb water properly, leading to a weak or uneven cast.
Line up the pieces of your mold, ensuring a tight fit. Secure them firmly with strong rubber bands or straps. This prevents the liquid slip from leaking out of the seams under pressure.
Step 2: Fill the Mold with Slip
Before pouring, make sure your slip is mixed to a smooth, even consistency, free of lumps or air bubbles.
Pour the slip into the mold's opening in a slow, steady stream. Pouring too quickly can introduce air bubbles that will create pinholes or weak spots in the final piece. Fill the mold completely to the top.
Step 3: Remove Excess Slip
This is the most critical step for determining the thickness of your piece. Allow the slip to sit in the mold. The plaster is now actively building the clay wall.
After a set amount of time (this can range from a few minutes to over half an hour, depending on the slip and mold), you will pour the excess liquid slip out. The clay that remains adhered to the inside is your cast piece.
Step 4: Release Your Casting from the Mold
After draining, the cast piece inside is still very soft. You must wait for it to dry and harden to a leather-hard state.
As the piece dries, it will shrink slightly and begin to pull away from the mold walls naturally. This is your cue that it's ready. Carefully remove the bands and gently separate the mold halves to reveal your greenware piece.
Step 5: Finish Your Piece
Once removed, the piece will have seam lines where the mold parts joined. This is perfectly normal.
Using a fettling knife or a clean-up tool, carefully trim away these seam lines. You can then use a damp sponge to smooth the surface for a clean, finished look before it dries completely for firing.
Common Pitfalls to Avoid
Understanding what can go wrong is as important as knowing the steps. Most issues in slip casting trace back to a misunderstanding of the core principles.
The Problem of a Damp Mold
Never use a mold that is still damp from a previous casting. A saturated mold cannot absorb more water, which means a proper clay wall will not form. This results in a very thin, weak cast that will likely collapse.
Inconsistent Slip and Air Bubbles
If your slip is too thick, it won't pour evenly into the mold's details. If it's too thin, it may not contain enough clay particles to build a solid wall. Always ensure your slip is well-mixed to the consistency of heavy cream.
Cracking and Warping
Cracking often occurs if you let the piece dry too much inside the mold. As the clay shrinks, the rigid mold prevents it from moving, causing stress fractures. If you release it too early when it's too soft, it can easily warp or deform under its own weight.
How to Apply This to Your Goal
Your approach to slip casting can be refined based on what you want to achieve.
- If your primary focus is consistent production: Pay meticulous attention to timing. Use a timer to control how long the slip dwells in the mold to ensure every piece has the same wall thickness.
- If your primary focus is creating delicate forms: Ensure you drain the excess slip thoroughly and handle the leather-hard piece with extreme care. Reinforce thin areas if necessary during the finishing stage.
- If your primary focus is a flawless surface finish: Be vigilant about cleaning your mold before every cast and take your time during the final fettling and smoothing stage.
By mastering the interplay of plaster, slip, and time, you can reliably produce clean, consistent ceramic forms.
Summary Table:
| Step | Key Action | Purpose |
|---|---|---|
| 1. Prepare | Clean and dry the plaster mold | Ensures proper water absorption for wall formation |
| 2. Fill | Pour mixed slip into the mold | Fills the cavity with liquid clay |
| 3. Drain | Pour out excess slip after set time | Determines the final wall thickness of the piece |
| 4. Release | Wait for piece to reach leather-hard state | Allows for safe removal from the mold |
| 5. Finish | Trim seams and smooth the surface | Prepares the greenware for firing |
Ready to achieve flawless ceramic casting results? The right equipment is crucial for consistency. KINTEK specializes in high-quality lab equipment and consumables for ceramics, including materials for slip preparation and mold making. Let our expertise support your creative process. Contact our specialists today to discuss your laboratory needs and how we can help you perfect your craft.
Visual Guide
Related Products
- Anti-Cracking Press Mold for Lab Use
- Alumina Al2O3 Ceramic Crucible Semicircle Boat with Lid for Engineering Advanced Fine Ceramics
- XRF & KBR plastic ring lab Powder Pellet Pressing Mold for FTIR
- Assemble Lab Cylindrical Press Mold
- Engineering Advanced Fine Ceramics Alumina Al2O3 Crucible With Lid Cylindrical Laboratory Crucible
People Also Ask
- What is the function of press molds during the preparation of SiCf/Ti-43Al-9V composites? Achieve Structural Precision
- How to use a press mould? Master the Art of Consistent Ceramic Forms
- What is the press mould method? A Guide to Consistent, Detailed Ceramic Forms
- Why are pressure molds with non-conductive resin inner walls required for battery testing? Ensure Data Accuracy
- What is a press mold used for? Achieve Repeatable Precision and Efficiency