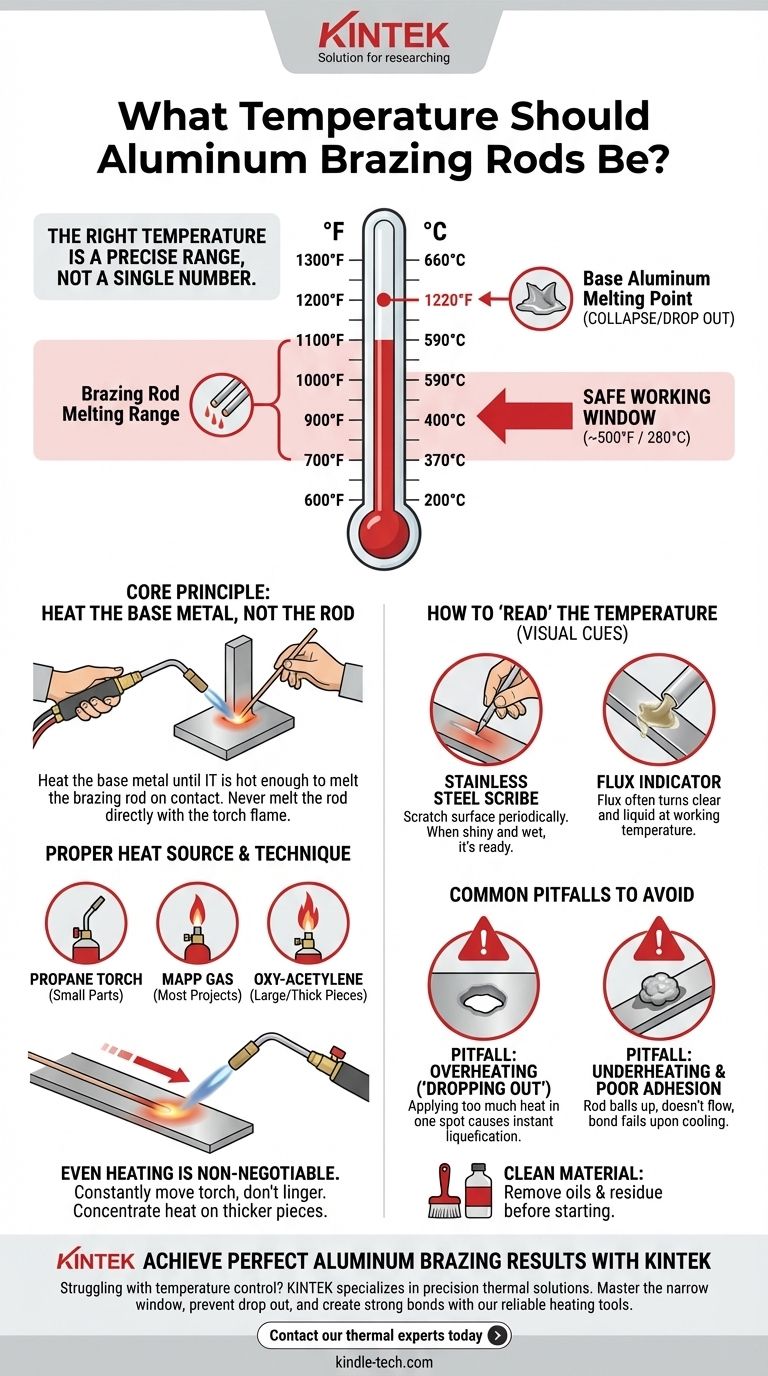
The right temperature for aluminum brazing is a precise range, not a single number. Most aluminum brazing or soldering rods melt between 700°F and 1100°F (370°C to 590°C). However, the true key to success is heating the base aluminum parts to this working temperature, as the aluminum itself will melt and collapse around 1220°F (660°C), leaving an extremely narrow window for error.
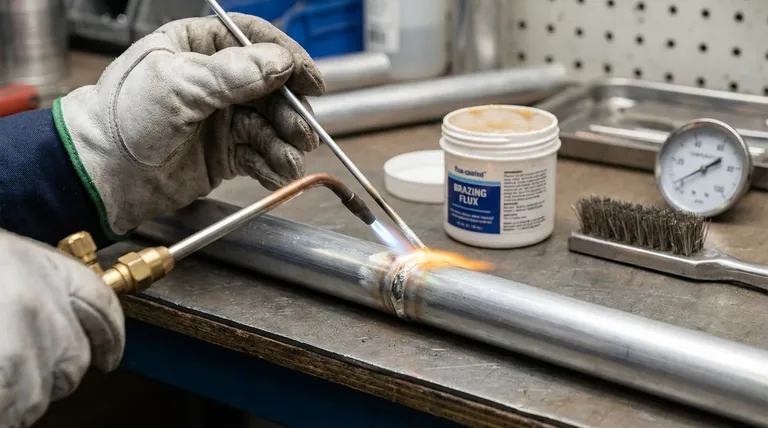
The core principle of aluminum brazing is this: you must heat the base metal until it is hot enough to melt the brazing rod on contact. Never melt the rod directly with your torch. This fundamental distinction is what separates a strong, permanent bond from a weak, failed attempt.
Why Temperature Control is Everything
Successfully brazing aluminum is less about the tool you use and more about your ability to manage heat. The metal's properties make this process uniquely challenging compared to steel.
The Critical Temperature Window
The gap between the brazing rod’s melting point (e.g., 730°F) and the base metal's melting point (1220°F) is your entire working range.
Unlike steel, aluminum does not glow red to warn you it's approaching its melting point. It will maintain its appearance until it suddenly "drops out" or collapses into a liquid state with little to no warning.
Heating the Base Metal, Not the Rod
The goal is to use the torch to bring the aluminum parts—the workpiece—up to the rod's flow temperature.
When the base metal is sufficiently hot, you simply touch the rod to the joint. The heat from the metal will instantly melt the rod, allowing it to flow deep into the joint via capillary action, creating a strong bond. Melting the rod with the torch flame will cause it to ball up on the surface with no adhesion.
How to "Read" the Temperature
Without industrial equipment, you must rely on visual and physical cues to gauge the temperature.
A common and effective technique is to use a stainless steel scribe or brush. As you heat the joint, periodically scratch the surface. When the metal is hot enough to break down the surface oxide layer, the scratch will appear shiny and wet. This is the signal that the aluminum is ready to accept the brazing rod.
The Role of Heat Source and Technique
Proper temperature management requires the right tool and the right application method.
Choosing Your Torch
For very small or thin parts, a simple propane torch may be sufficient.
However, for most projects, you will need a torch that delivers more heat, such as MAPP gas. For larger or thicker pieces, an oxy-acetylene torch with a neutral or slightly carburizing flame is often necessary to heat the entire joint area quickly and evenly.
Even Heating is Non-Negotiable
You must constantly move the torch across the entire joint area. Lingering in one spot will cause that area to overheat and melt long before the surrounding metal reaches the required temperature.
If joining pieces of different thicknesses, concentrate the majority of your heat on the thicker piece, allowing its heat to conduct into the thinner one.
The Function of Flux
Aluminum instantly forms a tough, transparent layer of oxide that prevents the brazing alloy from bonding. Flux, either applied separately or as a core within the rod, is a chemical agent designed to remove this oxide layer at brazing temperatures.
Observing the flux can also act as a temperature indicator. It will often turn clear and liquid when the base metal reaches the correct working temperature.
Common Pitfalls to Avoid
Understanding what can go wrong is critical to getting it right. The process is unforgiving of mistakes in preparation or heat control.
Pitfall: Overheating and "Dropping Out"
This is the most common failure. Applying too much heat in one spot will cause the aluminum to liquefy and create a hole instantly. Always keep the flame moving and heat a broad area.
Pitfall: Underheating and Poor Adhesion
If the base metal is too cool, the rod will not flow. It will either fail to melt or it will melt from the direct flame and clump on the surface. This creates no bond and the material will simply fall off after it cools.
Pitfall: Dirty or Unprepared Material
Brazing will fail on dirty aluminum. Before you begin, the joint must be mechanically cleaned with a dedicated stainless steel brush (never one used on steel) and wiped with a solvent like acetone to remove all oils and residue.
A Practical Checklist for Success
Use these guidelines to match your technique to your specific goal.
- If you are repairing thin material (like tubing or sheet): Use a lower-temperature rod and a softer, broader flame to heat the area gently and avoid burning through the metal.
- If you are joining thick and thin pieces: Focus 80% of your heat on the thicker piece, letting its heat conduct to the thinner piece to bring the entire joint to temperature uniformly.
- If your rod isn't flowing into the joint: Your base metal is not hot enough. Remove the rod, apply more heat to the workpiece in a wide pattern, and try again.
- If you create a hole in the aluminum: You have overheated the base metal. Stop immediately, pull the torch away, and allow the piece to cool completely before assessing the damage.
Mastering temperature control is the key that transforms aluminum brazing from a frustrating gamble into a reliable skill.
Summary Table:
| Key Temperature Parameter | Value |
|---|---|
| Brazing Rod Melting Point | 700°F - 1100°F (370°C - 590°C) |
| Base Aluminum Melting Point | 1220°F (660°C) |
| Safe Working Window | ~500°F (280°C) |
| Critical Technique | Heat base metal, not the rod |
Achieve Perfect Aluminum Brazing Results with KINTEK
Struggling with aluminum brazing temperature control? KINTEK specializes in precision lab equipment and thermal solutions that help technicians and manufacturers maintain exact temperature parameters for flawless metal joining. Our reliable heating tools and expert support ensure you work within the narrow 500°F window between rod melting and base metal failure.
We help you:
- Prevent base metal 'drop out' with precise temperature management
- Create strong, permanent bonds through proper heat application
- Master visual temperature cues for consistent results
Ready to transform your aluminum brazing from frustrating to reliable? Contact our thermal experts today for equipment solutions and technical guidance tailored to your specific project needs.
Visual Guide
Related Products
- Engineering Advanced Fine Alumina Al2O3 Ceramic Rod Insulated for Industrial Applications
- Precision Machined Yttrium Stabilized Zirconia Ceramic Rod for Engineering Advanced Fine Ceramics
- Custom PTFE Teflon Parts Manufacturer for PTFE Stirring Bar Recovery Rod
People Also Ask
- Why are alumina insulation discs used as sample supports in CCPN? Ensure Arcing-Free, Uniform Plasma Nitriding
- How is alumina ceramic made? A Guide to Manufacturing Methods and Material Properties
- How do alumina ceramic tubes address technical challenges in electrochemical devices? Ensure Peak Signal Integrity.
- What is ceramic insulation used for? Master High-Temperature Solutions for Industrial Efficiency
- What is the specific heat of alumina? It's a range from 451 to 955 J/kg·K