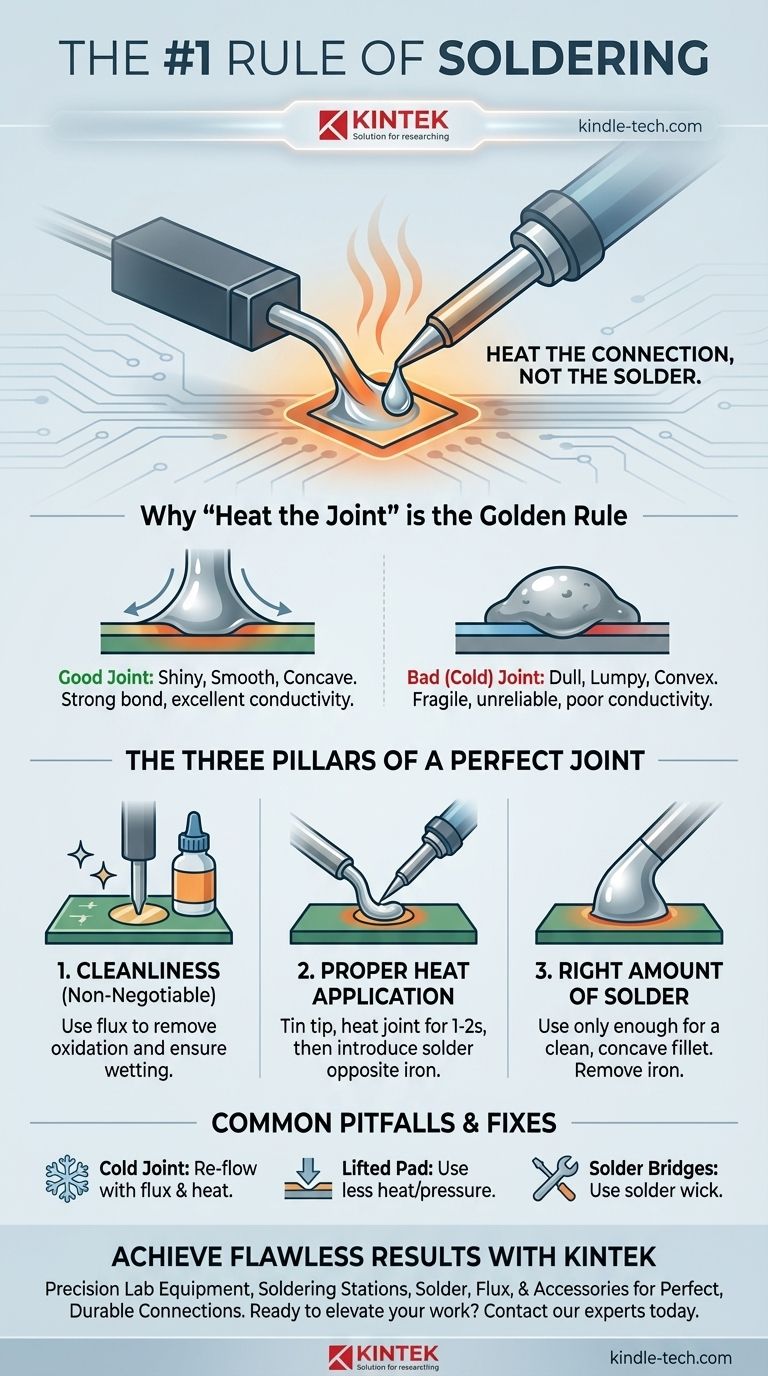
The single most important rule of soldering is to heat the connection, not the solder itself. This principle is the foundation for creating a strong, reliable, and conductive electrical bond. When you apply the soldering iron to the component lead and the copper pad simultaneously, you allow the solder to flow into the heated joint via capillary action, forming a proper metallurgical bond.
The goal of soldering isn't just to melt solder onto a component; it's to create a single, unified electrical and mechanical connection. The rule "heat the joint, not the solder" is the fundamental technique that ensures this bond actually forms, preventing the most common cause of electronic failures.
Why 'Heat the Joint' is the Golden Rule
Understanding the physics of how solder works is the key to mastering the technique. The iron is not a paint brush for applying solder; it is a tool for managing heat.
The Physics of Wetting and Solder Flow
Solder is drawn towards heat. This process, called wetting, is when the molten solder alloy chemically bonds with the metal of the component lead and the circuit board pad.
For proper wetting to occur, both surfaces must reach the solder's melting temperature.
If you touch the solder to the iron and simply "drip" it onto a cold connection, it will solidify without bonding. This creates a fragile, unreliable connection that looks like a ball sitting on the surface.
Identifying a Good Solder Joint
A correct solder joint, formed by heating the connection first, is easy to recognize. It will be shiny and smooth.
The solder will form a concave fillet, like a small ramp leading up from the circuit board pad to the component lead. This shape indicates the solder has wetted both surfaces and been pulled into the joint.
The Anatomy of a Bad Solder Joint
A bad joint, often called a cold solder joint, is the direct result of breaking the golden rule. It will appear dull, lumpy, or convex (ball-shaped).
These joints are mechanically weak and electrically poor. They often create intermittent connections that are notoriously difficult to diagnose, as they may work one moment and fail the next.
The Three Pillars of a Perfect Solder Joint
While heating the joint is the number one rule, it is supported by two other critical principles. Mastering all three will ensure professional, repeatable results.
Pillar 1: Cleanliness is Non-Negotiable
Metal surfaces, especially copper, oxidize quickly when exposed to air. This thin layer of oxidation acts as an insulator, preventing the solder from wetting the surface.
Solder flux is a chemical cleaning agent that removes this oxidation when heated. Most electronics solder has a core of flux inside, but applying a small amount of additional flux to the joint before heating dramatically improves the result.
Pillar 2: Proper Heat Application
This is the golden rule in action. The process is simple and efficient:
- Tin the tip of your clean iron with a tiny amount of solder. This improves heat transfer.
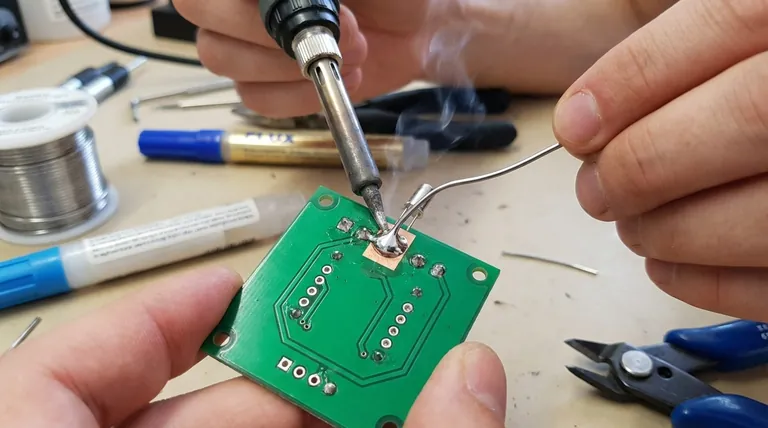
- Touch the iron to the point where the component lead and the circuit board pad meet.
- Wait 1-2 seconds for heat to transfer into both parts of the joint.
- Introduce the solder to the joint, on the side opposite the iron. It should melt and flow instantly.
Pillar 3: Use the Right Amount of Solder
A common beginner mistake is to use far too much solder, creating large blobs that risk shorting out adjacent connections.
You only need enough solder to form a clean, concave fillet. Once the joint is properly wetted and the fillet is formed, feed no more solder and remove the iron. The entire process should only take 3-5 seconds.
Common Pitfalls and How to Avoid Them
Even with the right knowledge, mistakes happen. Recognizing them is the first step toward fixing and preventing them.
The Cold Solder Joint
This is the most common failure, caused by not heating the joint enough before applying solder. The fix is to re-flow it: apply a bit of flux, heat the joint correctly with the iron, and let the existing solder wet the connection properly.
Lifting a Pad (Too Much Heat)
The opposite problem is applying heat for too long or with too much pressure. This can weaken the adhesive holding the copper pad to the board, causing it to lift off.
Be efficient. If the solder doesn't flow within a few seconds, remove the iron, let the joint cool, and reassess. The issue is likely cleanliness (add more flux) or poor heat transfer.
Solder Bridges
This occurs when excess solder accidentally connects two adjacent points, creating a short circuit. This is usually caused by using too much solder or dragging the iron across pins.
To fix a bridge, apply flux and use solder wick (desoldering braid) to absorb the excess solder.
Making the Right Choice for Your Goal
Apply this core knowledge with a specific intent to dramatically improve your results.
- If your primary focus is learning the basics: Concentrate solely on mastering the 'heat the joint' technique until it is muscle memory.
- If your primary focus is repairing faulty electronics: Suspect cold solder joints first. Re-flow them by applying flux and properly heating the pad and lead together before removing the iron.
- If your primary focus is achieving professional-grade reliability: Integrate the three pillars: start with pristine cleanliness, execute perfect heat transfer, and use only the minimal amount of solder required for a clean, concave fillet.
Mastering this one foundational rule is the difference between hoping your circuit works and knowing it will.
Summary Table:
| Aspect | Good Joint (Follows Rule) | Bad Joint (Breaks Rule) |
|---|---|---|
| Appearance | Shiny, smooth, concave fillet | Dull, lumpy, convex (ball-shaped) |
| Strength | Strong, reliable metallurgical bond | Fragile, unreliable connection |
| Electrical Conductivity | Excellent | Poor, often intermittent |
| Common Cause | Heating the pad and lead first | Applying solder directly to the iron |
Achieve Flawless Results with the Right Tools
Mastering the number one rule of soldering is essential, but having the right equipment makes all the difference. Whether you are a student learning the basics, a technician performing repairs, or an engineer building professional-grade electronics, KINTEK has the precision tools you need.
KINTEK specializes in lab equipment and consumables, serving all your laboratory and electronics workshop needs. From reliable soldering stations and high-quality solder to essential accessories like flux and desoldering braid, we provide the reliable products that help you create perfect, durable connections every time.
Ready to elevate your soldering work? Contact our experts today to find the perfect solutions for your specific projects and ensure your electronic assemblies are built to last.
Visual Guide