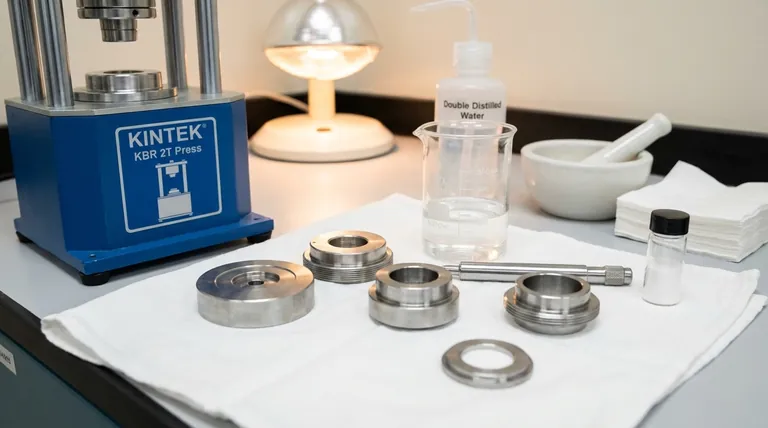
To properly prepare for KBr pellet analysis, you do not clean the pellet itself, as it is a single-use consumable. Instead, you must meticulously clean the components of the die set—the mortar, pestle, and anvils—to prevent contamination. The standard procedure involves washing these parts with a solvent like acetone, followed by a rinse with double-distilled water, and then thoroughly drying them, often in an oven.
The quality of your FTIR spectrum is determined before you even press the pellet. The ultimate goal is not just a clean die set, but the complete elimination of contaminants and moisture, which requires a disciplined approach to both cleaning the equipment and handling the KBr powder.
Why Cleaning is the Foundation of Good Spectra
FTIR spectroscopy is an incredibly sensitive technique. Any residual material from a previous sample, cleaning solvents, or atmospheric moisture left on your die set will be pressed into your pellet and will appear in your final spectrum, potentially obscuring or being mistaken for peaks from your actual sample.
Step 1: Initial Mechanical Cleaning
Before introducing any solvents, physically remove as much residue as possible. Use a clean, dry lab tissue to thoroughly wipe down the mortar, pestle, and the faces of the anvils. This prevents caked-on material from being simply smeared around by the solvent.
Step 2: The Solvent Wash
Acetone is the most common and effective solvent for this task. It evaporates quickly and is excellent at dissolving many organic residues. After the initial wipe, wash all components with acetone. For stubborn contamination, a rinse with chloroform can be used, but acetone is sufficient for most applications.
Step 3: The Final Rinse
After the primary solvent wash, perform a final rinse with double-distilled water. This helps remove any inorganic salts or residues that acetone may not have dissolved. This step is crucial for achieving an exceptionally clean baseline for sensitive measurements.
Step 4: Absolute Drying
This is arguably the most critical step. Any remaining water or solvent will produce large, broad absorption bands in your spectrum. After the final rinse, place the cleaned die set components in an oven or under a heat lamp to dry completely. A warm, dry die set also prevents atmospheric moisture from condensing on it when you add your KBr powder.
Common Pitfalls to Avoid
Even with a perfectly clean die, simple mistakes in technique can ruin your results. Avoiding these common errors is just as important as the cleaning protocol itself.
The Mistake of Grinding Your KBr
Never grind the KBr powder by itself. Grinding opens up new crystal facets, dramatically increasing the surface area available to absorb atmospheric moisture. Water has a very strong IR absorbance and will easily overwhelm your spectrum.
The Correct Mixing Technique
The proper method is to first grind your solid sample into a fine powder. Then, add the KBr powder and mix it gently with the sample using the mortar and pestle. This ensures the sample is intimately dispersed without exposing the KBr to excessive moisture.
Using Too Much Powder
A common error is to overload the die with KBr powder. This requires excessive force to press, which can trap air, create opaque white spots in the pellet, or even cause the pellet to wedge itself into the die. Use only the minimum amount of powder needed to create a thin, even coating on the anvil face.
Ignoring the Die Temperature
Ensure your die set, anvils, and KBr powder are all at the same temperature before pressing. Using a warm die set (fresh from the oven) prevents condensation and helps create a transparent, high-quality pellet.
Making the Right Choice for Your Goal
Your cleaning and preparation rigor should match the sensitivity required for your analysis.
- If your primary focus is routine compound identification: A thorough acetone wash followed by careful drying of the die set is generally sufficient to prevent significant cross-contamination.
- If your primary focus is quantitative analysis or detecting subtle features: A multi-step process using an acetone wash, a distilled water rinse, and extended oven drying is mandatory for a clean, flat baseline.
- If you are consistently seeing broad water peaks in your spectra: Your problem is almost certainly moisture. Focus on rigorously drying the die set and avoid grinding the KBr powder at all costs.
A disciplined and consistent preparation process is the foundation upon which every reliable KBr pellet analysis is built.
Summary Table:
| Step | Key Action | Purpose |
|---|---|---|
| 1. Mechanical Cleaning | Wipe with dry lab tissue | Remove physical residue |
| 2. Solvent Wash | Wash with acetone | Dissolve organic contaminants |
| 3. Final Rinse | Rinse with double-distilled water | Remove inorganic residues |
| 4. Drying | Dry in oven/under heat lamp | Eliminate moisture and solvents |
Achieve Flawless FTIR Results with KINTEK
Struggling with contamination or water peaks in your KBr pellet spectra? The quality of your analysis starts with your preparation. KINTEK specializes in providing the high-quality lab equipment and consumables you need for reliable FTIR spectroscopy.
- High-Purity KBr Powder: Ensure a clean baseline from the start.
- Durable Pellet Dies: Engineered for consistent, high-pressure pressing.
- Expert Support: Get advice on best practices for sample preparation.
Let us help you eliminate variables and achieve publication-ready data. Contact our experts today to discuss your lab's specific needs!
Visual Guide

Related Products
- XRF & KBR plastic ring lab Powder Pellet Pressing Mold for FTIR
- XRF & KBR steel ring lab Powder Pellet Pressing Mold for FTIR
- kbr pellet press 2t
- Ring Press Mold for Lab Applications
- Laboratory Hydraulic Pellet Press for XRF KBR FTIR Lab Applications
People Also Ask
- What is the purpose of using potassium bromide KBr in the FTIR measurement? Achieve Clear, Accurate Solid Sample Analysis
- How are samples prepared for XRF analysis? Achieve Accurate and Reliable Results
- What is the XRF method of sampling? Achieve Accurate Elemental Analysis with Proper Sample Prep
- How does a laboratory powder pellet press facilitate the preparation of multi-layered gradient Al2O3/ZrO2 ceramic green bodies? Precision Bonding Techniques
- Why is a laboratory pellet press used before pyrolysis? Optimize Heat Transfer & Consistency in Porous Carbon Synthesis


