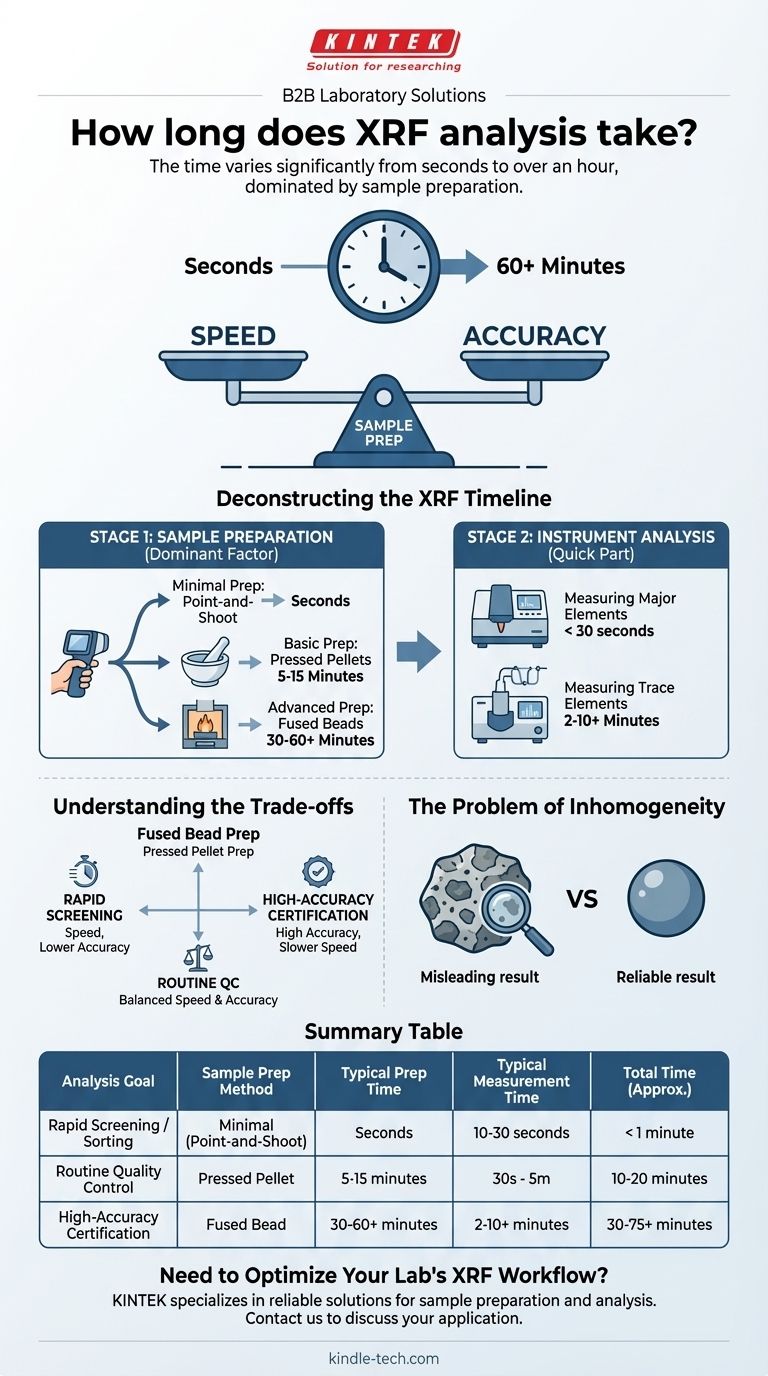
The time for an XRF analysis varies significantly, from a few seconds for a simple screening to over an hour for a high-precision laboratory analysis. The instrument's measurement time is often very fast, typically lasting seconds to a few minutes. However, the total time is almost always dictated by the sample preparation required to get a reliable result.
While the XRF instrument can measure a sample in minutes, the true time commitment is determined by sample preparation. This critical step ensures the sample is homogeneous and representative, and it can range from virtually no time for a simple metal scan to over an hour for creating a fused bead for precise geological analysis.
Deconstructing the XRF Timeline
The total time to get a result from X-ray Fluorescence (XRF) is best understood as two distinct stages. The first stage, sample preparation, is often the most time-consuming and has the largest impact on the quality of the final data.
Stage 1: Sample Preparation (The Dominant Factor)
The goal of preparation is to present a flat, uniform, and representative surface to the instrument. As the references state, this involves steps to create a homogeneous sample.
Minimal Prep: Point-and-Shoot (Seconds) For some applications, like sorting scrap metal or screening consumer products with a handheld XRF analyzer, no preparation is needed. The analysis is performed directly on the object's surface. This is the fastest method but is also the least accurate, as it only measures a small, potentially unrepresentative spot.
Basic Prep: Pressed Pellets (5-15 Minutes) This is a very common method for powders, soils, and minerals. The process involves crushing and grinding the sample into a fine powder, then pressing it under high pressure to form a solid, flat disc or "pellet." While the individual steps are quick, the entire workflow for a single sample takes several minutes.
Advanced Prep: Fused Beads (30-60+ Minutes) For the highest level of accuracy, especially in geological or cement applications, the fused bead method is the gold standard. The sample powder is mixed with a lithium borate flux, heated in a crucible to over 1000°C until it melts, and then cooled into a perfectly uniform glass disc. This eliminates errors from particle size and mineralogical effects but is the most complex and time-consuming preparation method.
Stage 2: Instrument Analysis (The Quick Part)
Once a properly prepared sample is placed in the spectrometer, the measurement itself is relatively fast. The exact time depends on the elements of interest and the precision required.
Measuring Major Elements When analyzing for elements present in high concentrations (e.g., iron in a steel alloy), the X-ray signals are strong. A reliable measurement can often be achieved in under 30 seconds.
Measuring Trace Elements To detect elements at very low concentrations (parts per million), a longer measurement time is required. This allows the detector to collect more X-ray counts, improving the signal-to-noise ratio and providing a more statistically robust result. This can take 2 to 10 minutes or more.
Understanding the Trade-offs
The choice of XRF method always involves a balance between three competing factors: speed, cost, and accuracy.
Speed vs. Accuracy
This is the fundamental trade-off. A direct "point-and-shoot" analysis is nearly instantaneous but provides semi-quantitative results that may not be representative of the whole object. Conversely, the fused bead method is slow and requires specialized equipment but delivers the most accurate and precise data possible.
The Problem of Inhomogeneity
Ignoring proper sample preparation is the most common pitfall in XRF analysis. Measuring an unprepared, non-homogeneous sample (like a rock with visible mineral grains) gives a result for only the small area being analyzed. This result can be highly misleading and is not representative of the bulk material. The time spent on preparation is an investment in data reliability.
Matching the Method to Your Goal
The "right" amount of time for an XRF analysis depends entirely on what you need to achieve with the data.
- If your primary focus is rapid screening or material sorting: A handheld XRF is ideal, providing "point-and-shoot" results in seconds without sample prep.
- If your primary focus is routine process or quality control: The pressed pellet method offers an excellent balance, with a total turnaround time of 10-20 minutes per sample for reliable, quantitative data.
- If your primary focus is high-accuracy certification or research-grade analysis: The fused bead method is the required approach, demanding an investment of 30-60 minutes per sample to achieve the most precise results.
Ultimately, understanding these factors allows you to choose an XRF workflow that ensures your results are not just fast, but fundamentally fit for purpose.
Summary Table:
| Analysis Goal | Sample Prep Method | Typical Prep Time | Typical Measurement Time | Total Time (Approx.) |
|---|---|---|---|---|
| Rapid Screening / Sorting | Minimal (Point-and-Shoot) | Seconds | 10-30 seconds | < 1 minute |
| Routine Quality Control | Pressed Pellet | 5-15 minutes | 30 seconds - 5 minutes | 10-20 minutes |
| High-Accuracy Certification | Fused Bead | 30-60+ minutes | 2-10+ minutes | 30-75+ minutes |
Need to Optimize Your Lab's XRF Workflow?
The right equipment is key to balancing speed and accuracy in your XRF analysis. KINTEK specializes in lab equipment and consumables, serving laboratory needs with reliable solutions for sample preparation and analysis.
We can help you select the perfect equipment to ensure your results are not just fast, but fundamentally fit for purpose.
Contact us today to discuss your specific application and receive a personalized recommendation!
Visual Guide