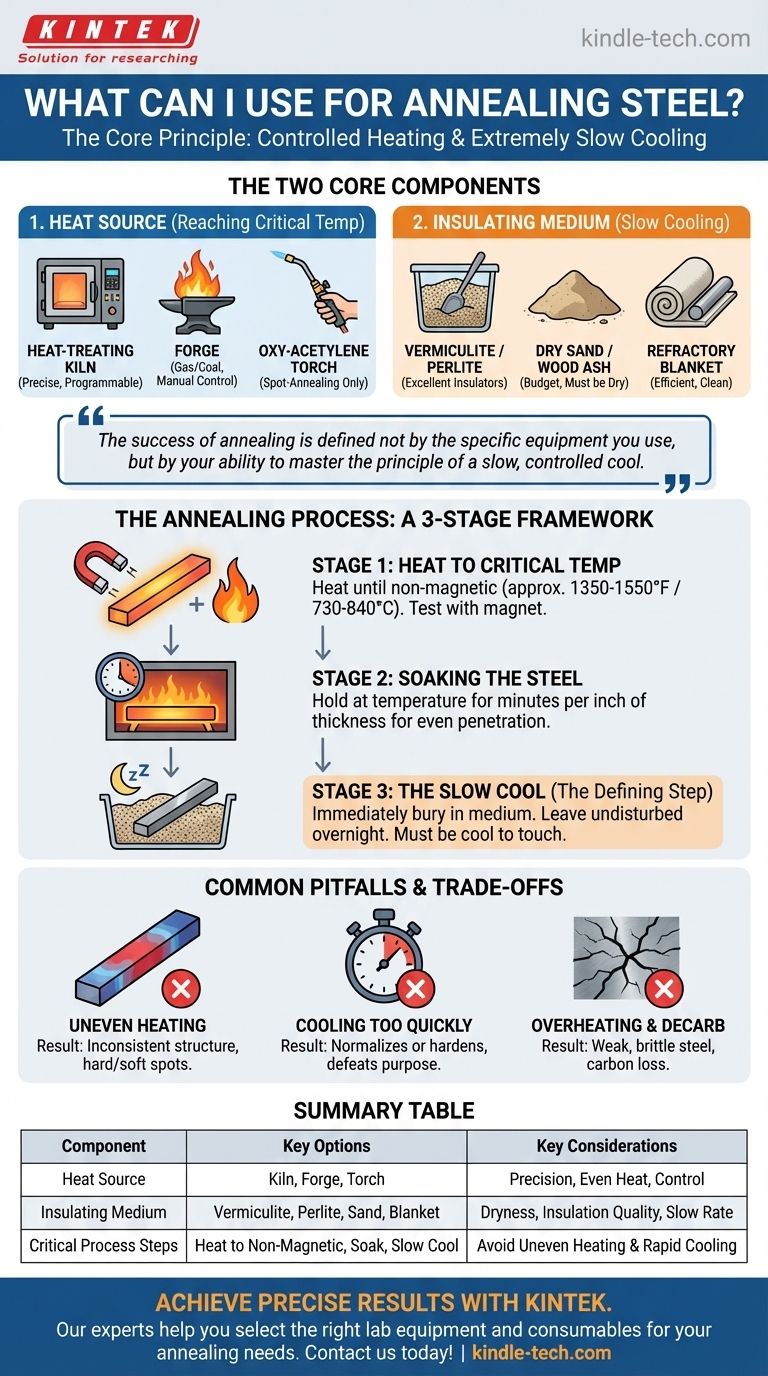
For annealing steel, you need two primary components: a heat source capable of reaching the steel's critical temperature and an insulating medium to ensure the steel cools down as slowly as possible. The specific tools can range from professional-grade kilns to simpler setups used by hobbyists, but the core principle of controlled heating and extremely slow cooling remains the same.
The success of annealing is defined not by the specific equipment you use, but by your ability to master the principle of a slow, controlled cool. The tools are simply the means to achieve the soft, stress-relieved state that is the goal of the process.

The Two Core Components of an Annealing Setup
Annealing is a process of controlled heating and cooling. Your setup, therefore, must be able to manage both phases effectively.
Choosing a Heat Source
The goal is to bring the entire piece of steel to a specific temperature (the austenitizing or "critical" temperature) and hold it there evenly.
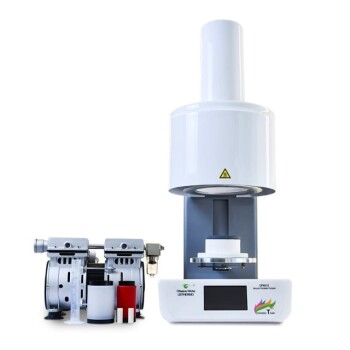
- Heat-Treating Oven or Kiln: This is the ideal and most precise method. A programmable kiln allows you to set an exact temperature and hold it for a specific duration, ensuring a perfect soak.
- Forge (Gas or Coal): Commonly used by blacksmiths, a forge can easily reach the required temperatures. The primary challenge is maintaining an even heat across the entire workpiece and avoiding overheating.
- Oxy-Acetylene Torch: This method is only suitable for spot-annealing small sections of a larger piece. It is very difficult to achieve the uniform heating required for annealing an entire blade or tool with a torch.
Selecting an Insulating Medium for Slow Cooling
This is arguably the most critical part of the process. The goal is to trap heat and force the steel to cool over many hours, allowing its internal grain structure to realign and soften.
- Vermiculite: A lightweight, granular mineral that is an excellent insulator. Burying the hot steel in a large container of vermiculite is a very common and effective method.
- Perlite: Similar to vermiculite, this volcanic glass is also a superb insulator and works in the same way.
- Dry Sand or Wood Ash: These are more accessible, budget-friendly options. It is crucial that they are perfectly dry, as any moisture will steal heat too quickly and ruin the anneal.
- Refractory Blanket (Kaowool): A high-performance ceramic fiber blanket that can be wrapped tightly around the hot steel. This is a very clean and efficient way to control the cooling rate.
The Annealing Process: A Step-by-Step Framework
Knowing the tools is only half the battle. Understanding the process is what ensures a successful outcome.
Stage 1: Heating to Critical Temperature
You must heat the steel until it reaches its non-magnetic state, known as the austenitizing temperature (typically between 1350-1550°F or 730-840°C, depending on the alloy).
A simple and effective test is to use a magnet. As you heat the steel, periodically touch it with a magnet on a long handle. When the steel no longer attracts the magnet, you have reached the proper temperature. Relying on color (e.g., a "dull cherry red") is less precise.
Stage 2: Soaking the Steel
Once at temperature, you need to "soak" the steel by holding it at that temperature. This ensures the heat has penetrated completely and the internal structure has fully transformed. A general rule is to soak for several minutes per inch of thickness.
Stage 3: The Slow Cool (The Defining Step)
Immediately transfer the hot steel from your heat source to your insulating medium. Bury it completely, ensuring at least several inches of insulation on all sides.
Leave the container undisturbed for many hours, preferably overnight. The steel should be cool to the touch before you remove it. Any attempt to speed this up will compromise the process.
Understanding the Trade-offs and Common Pitfalls
Mistakes in annealing are common and almost always relate to temperature control.
Uneven Heating
If one part of the steel gets hotter than another, it will result in an inconsistent structure with hard and soft spots. This is a significant risk when using a forge or torch without careful technique.
Cooling Too Quickly
This is the most common failure. Pulling the steel from the insulator too early or using a damp medium (like wet sand) will cool it too fast. This doesn't anneal the steel; it may normalize or even partially harden it, defeating the entire purpose.
Overheating and Decarburization
Heating the steel far beyond its critical temperature can cause the grain structure to grow excessively, making the steel weak and brittle. It also risks "decarburization," where carbon is burned off the surface, which is detrimental for any tool that needs to be re-hardened later.
Making the Right Choice for Your Goal
Your equipment choice should align with your project's needs and your available resources.
- If your primary focus is maximum precision for toolmaking: A temperature-controlled kiln and a large bin of vermiculite or perlite are your best investment.
- If you are a blacksmith or hobbyist with a forge: Focus on achieving an even heat and immediately bury the piece in a large, dry container of sand or ash.
- If you only need to soften a small area for drilling or filing: An oxy-acetylene torch can work, but focus the heat carefully and, if possible, wrap the area in a refractory blanket to slow the cooling.
Mastering the slow, controlled cool is the true key to successful annealing.
Summary Table:
| Component | Key Options | Key Considerations |
|---|---|---|
| Heat Source | Heat-Treating Kiln, Forge, Oxy-Acetylene Torch | Precision, even heating, temperature control |
| Insulating Medium | Vermiculite, Perlite, Dry Sand, Refractory Blanket | Dryness, insulation quality, slow cooling rate |
| Critical Process Steps | Heat to non-magnetic state, Soak, Slow cool overnight | Avoid uneven heating and rapid cooling |
Achieve precise, stress-free annealing results for your laboratory or workshop. KINTEK specializes in high-quality lab equipment and consumables, including reliable heat sources and insulating materials perfect for your steel treatment needs. Our experts can help you select the right tools to master the critical slow-cool process. Contact us today to enhance your annealing capabilities!
Visual Guide
Related Products
- Electric Rotary Kiln Small Rotary Furnace for Activated Carbon Regeneration
- Electric Rotary Kiln Small Rotary Furnace Biomass Pyrolysis Plant
- Electric Rotary Kiln Continuous Working Small Rotary Furnace Heating Pyrolysis Plant
- Electric Rotary Kiln Pyrolysis Furnace Plant Machine Calciner Small Rotary Kiln Rotating Furnace
- Dental Porcelain Zirconia Sintering Ceramic Vacuum Press Furnace
People Also Ask
- What is the temperature of a rotating kiln? It Depends on Your Material and Process Goal
- What are the principles of a rotary kiln? Master the Mechanics of High-Temperature Processing
- What are the characteristics of the slipping, slumping, and rolling modes of bed motion? Optimize Your Rotary Process
- How are rotary kilns heated? Direct vs. Indirect Heating Methods Explained
- Is rotary kiln a furnace? Discover the Key Differences for Industrial Processing