An overheated brazed joint is most clearly indicated by the appearance of the filler metal and the condition of the surrounding base metal. Instead of a bright, smooth, and clean fillet, you will see a dull, gray, porous, and rough surface. The base metal itself will often show signs of excessive oxidation, such as a dark, flaky scale, which signals that the joint's integrity has been fundamentally compromised.
Overheating is not a cosmetic issue; it is a sign of a chemical and metallurgical failure. It indicates that the flux has been destroyed and the filler alloy has been damaged, resulting in a weak, brittle, and unreliable connection that is prone to leaks and structural failure.

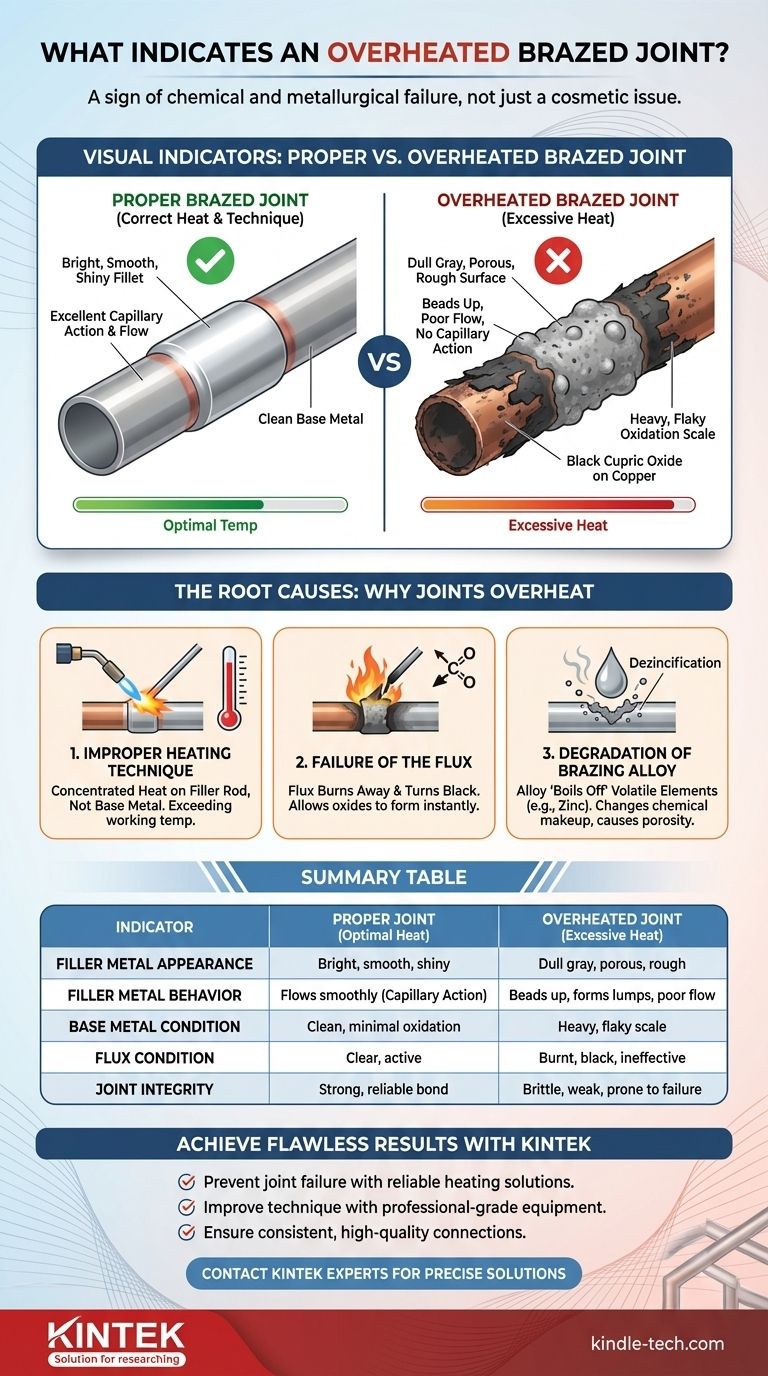
Visual Indicators of an Overheated Joint
A properly executed braze is easily identified by its clean and smooth appearance. Overheating leaves behind a distinct set of visual cues that signal a failed joint.
The Appearance of the Filler Metal
The most immediate sign is the brazing alloy itself. A good joint will have a bright, shiny, and smooth fillet that blends neatly between the two base metals.
An overheated joint will feature a filler metal that is dull gray or even black. The surface will be rough and porous, often appearing pitted or crystalline instead of smooth.
The Behavior of the Filler Metal
Proper brazing relies on capillary action, where the molten filler is drawn cleanly into the tight space between the base metals.
When a joint is overheated, the filler metal will fail to flow properly. It will tend to bead up or form lumps on the surface rather than being pulled into the joint. This indicates the flux has broken down and is no longer cleaning the metal surfaces.
The Condition of the Base Metal
The damage from overheating extends beyond the filler. Pay close attention to the base metals immediately adjacent to the joint.
On copper tubing, for example, overheating creates a thick, flaky black cupric oxide scale. This is different from the thin, reddish cuprous oxide of a properly heated joint. On steel, you may see heavy blue or gray discoloration far from the joint area.
The Root Causes: Why Joints Overheat
Understanding what is happening at a chemical level is key to preventing this common failure mode. Overheating is a result of poor technique, not simply a matter of time.
Improper Heating Technique
The most common cause is misapplication of the torch. Heating should be broad, even, and focused on the base metals, not the filler alloy itself.
When the flame is held in one spot for too long or is concentrated directly on the brazing rod, you rapidly exceed the working temperature range of both the flux and the alloy.
Failure of the Flux
Flux is a chemical agent with a specific activation temperature range. Its job is to clean the metal and prevent oxidation during heating.
If you overheat the joint, you burn the flux away. The flux will turn black and stop working, allowing oxides to form instantly on the hot metal. These oxides create a barrier that the filler alloy cannot penetrate, preventing a proper bond.
Degradation of the Brazing Alloy
Brazing alloys are carefully formulated metal mixtures. Excessive heat can damage this formulation, often by "boiling off" more volatile elements.
For example, in common brass-based brazing alloys, overheating can cause the zinc to vaporize out of the alloy (a process known as dezincification). This changes the alloy's chemical makeup, reduces its strength, and often creates porosity within the joint.
Understanding the Trade-offs: Heat Control vs. Speed
It can be tempting to use excessive heat to complete a job more quickly. This is a critical mistake that sacrifices the integrity of the work.
The Temptation of "More Heat"
Beginners often believe that a hotter flame or longer heating time will ensure the filler flows. They apply intense, direct heat, hoping to force the process to happen faster.
The Consequence: A Brittle and Unreliable Joint
This approach achieves the opposite of the desired result. The "speed" gained by overheating comes at the direct cost of strength and reliability. The resulting joint is cosmetically poor, structurally weak, and almost certain to fail under pressure or vibration.
Under-heating: The Other Side of the Coin
While less destructive, under-heating also results in a failed joint. If the base metals are not hot enough, the filler alloy will not melt or flow correctly, creating a "cold joint" that simply sits on the surface with no bond. The goal is a precise temperature window, not just "hot."
Making the Right Choice for Your Goal
Achieving a perfect braze is about precise heat control. The visual indicators are not just signs of a problem; they are feedback to help you refine your technique.
- If your primary focus is strength and reliability: Prioritize even heating of the base metals and allow them to melt the filler alloy, never heating the filler rod directly with the flame.
- If your primary focus is quality control: Train your eyes to look for a bright, smooth, and well-formed fillet, and immediately reject any joint that appears dull, porous, or surrounded by burnt scale.
- If your primary focus is learning and practice: Use the flux as your temperature indicator; when it becomes clear and liquid like water, the base metal is at the perfect temperature to accept the filler alloy.
Mastering heat control is the defining skill that separates a novice from an expert and a failed joint from a successful one.
Summary Table:
| Indicator | Proper Brazed Joint | Overheated Brazed Joint |
|---|---|---|
| Filler Metal Appearance | Bright, smooth, shiny fillet | Dull gray, porous, rough surface |
| Filler Metal Behavior | Flows smoothly via capillary action | Beads up, forms lumps, poor flow |
| Base Metal Condition | Clean, minimal oxidation | Heavy, flaky scale (e.g., black cupric oxide on copper) |
| Flux Condition | Clear, active | Burnt, black, ineffective |
| Joint Integrity | Strong, reliable bond | Brittle, weak, prone to failure |
Achieve Flawless Brazing Results with KINTEK
Don't let overheating compromise your brazing projects. Proper technique and the right equipment are essential for creating strong, reliable joints. KINTEK specializes in high-quality lab equipment and consumables, providing the tools and expertise needed for precise temperature control and consistent results.
We help you:
- Prevent joint failure with reliable heating solutions
- Improve your brazing technique with professional-grade equipment
- Ensure consistent, high-quality connections for your critical applications
Ready to perfect your brazing process? Contact our experts today to discuss how KINTEK's solutions can meet your laboratory's specific brazing and heating needs!
Visual Guide