In vacuum casting, a combination of precise mold design, simple reinforcements, and fundamental physics keeps the mold halves securely together. The primary elements are interlocking registration keys built into the silicone mold, high-tack tape applied along the parting line, and the powerful, uniform force of atmospheric pressure that acts as an invisible clamp once the vacuum is released.
The core principle is straightforward: while interlocking keys provide initial alignment and tape secures the seam, it is the reintroduction of atmospheric pressure after pouring that provides the primary clamping force, pressing the mold halves together to ensure a flawless cast.
The Anatomy of a Secure Mold
Before examining the forces at play, it's crucial to understand how the silicone mold itself is designed for stability. A well-made mold is the foundation of the entire process.
The Silicone Material
Silicone is the material of choice for its flexibility, which allows for the casting of complex geometries and undercuts. However, it is also firm enough to hold its shape under the weight of the casting resin.
The Parting Line
This is the seam where the two halves of the mold meet. Its design is critical. A clean, simple parting line is easier to seal and produces less "flash"—the thin, unwanted excess material that can leak out of the seam.
Interlocking Registration Keys
This is the most critical design feature for mold alignment. The mold halves are created with matching keys—a series of bumps on one side and corresponding indentations on the other. These keys physically lock the two halves into a precise, repeatable position, preventing any sliding or shifting.
The Physics at Play: From Vacuum to Clamp
The "vacuum" in vacuum casting is often misunderstood. Its primary purpose is to remove air, but its release is what generates the clamping force.
Step 1: Creating the Vacuum
The assembled silicone mold is placed inside a chamber, and a vacuum pump removes the air from both the chamber and the mold cavity itself. At this stage, there is nearly equal low pressure inside and outside the mold, so there is no significant force trying to push it apart.
Step 2: Pouring the Resin
While under vacuum, the two-part casting resin is mixed and poured into the mold. The absence of air ensures the resin fills every tiny detail of the cavity without creating bubbles, which would be a critical defect in the final part.
Step 3: Releasing the Vacuum
This is the key step. Once the mold is full, air is allowed back into the chamber. The returning air instantly creates atmospheric pressure (approximately 14.7 psi or 1 bar at sea level) on the outside of the mold. Because the inside is filled with liquid resin, this external pressure acts as a powerful and perfectly uniform clamp, pressing the mold halves together tightly from all directions.
Practical Reinforcements: The Engineer's Touch
While physics provides the main clamping force, technicians rely on simple, practical measures to guarantee a perfect seal and prevent handling errors.
The Role of High-Tack Tape
Before the mold is placed in the chamber, its parting line is almost always sealed with a strong adhesive tape. This serves two purposes: it holds the halves together during handling and provides a crucial secondary seal to prevent any resin from leaking out before the atmospheric pressure takes over.
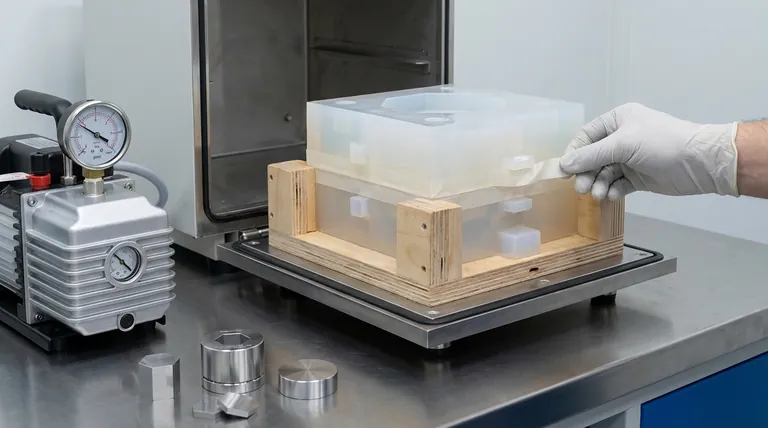
Using Support Frames or Boxes
A flexible silicone mold can be distorted if handled improperly. To prevent this, the mold is often placed inside a simple plywood or plastic box. This support frame ensures the mold remains square and stable during the pouring and curing process.
Common Pitfalls to Avoid
Understanding what holds the mold together also illuminates common failure points. A compromised seal or alignment leads directly to rejected parts.
Poorly Designed Parting Lines
A complex, jagged parting line is difficult to tape securely and is prone to leaking, resulting in excessive flash that requires manual cleanup.
Inadequate Registration Keys
If the registration keys are too small, too few, or poorly designed, the mold halves can misalign. This is a critical failure that results in a dimensionally inaccurate part.
Releasing the Vacuum Too Quickly
Allowing air to rush back into the chamber too rapidly can create turbulence. This can disturb the resin in the mold before it has time to settle, potentially introducing surface imperfections.
Making the Right Choice for Your Goal
The stability of your mold is a direct result of thoughtful design and correct procedure.
- If your primary focus is part accuracy: The design and implementation of your registration keys is the single most important factor.
- If your primary focus is preventing leaks and flash: A well-planned, simple parting line combined with careful and thorough taping is essential.
- If you are new to the process: Always use a simple support box to handle the mold, as this removes the risk of flexing it by hand and compromising the seal.
Ultimately, a successful vacuum cast relies on a mold designed to work in harmony with atmospheric pressure, not against it.
Summary Table:
| Component | Primary Function |
|---|---|
| Registration Keys | Ensures precise alignment of mold halves, preventing shifting. |
| High-Tack Tape | Seals the parting line and secures halves during handling. |
| Atmospheric Pressure | Acts as a uniform clamping force after vacuum release. |
| Support Frame/Box | Maintains mold stability and shape during pouring and curing. |
Achieve flawless vacuum casting results with KINTEK's precision lab equipment. Our vacuum chambers, silicone molds, and casting consumables are engineered to work in harmony with atmospheric pressure, ensuring your molds stay perfectly sealed for high-accuracy, bubble-free parts. Whether you're prototyping or in production, KINTEK provides the reliable tools and expertise to elevate your lab's capabilities. Contact us today to discuss your specific needs and discover the right solution for your projects!
Visual Guide

Related Products
- CF KF Flange Vacuum Electrode Feedthrough Lead Sealing Assembly for Vacuum Systems
- Ring Press Mold for Lab Applications
- Multi-Punch Rotary Tablet Press Mold Ring for Rotating Oval and Square Molds
- Molybdenum Tungsten Tantalum Special Shape Evaporation Boat
- XRF & KBR steel ring lab Powder Pellet Pressing Mold for FTIR
People Also Ask
- What is the principle of vacuum system? Creating a Controlled Low-Pressure Environment
- What is the purpose of a vacuum system? Achieve Unmatched Process Control and Purity
- Can an arc happen in a vacuum? Yes, and here's how to prevent it in your high-voltage design.
- What is the importance of leakage in a vacuum system? Prevent Contamination and Process Failure
- What are the factors that affect the strength of a brazed joint? Master the 4 Keys to a Perfect Bond