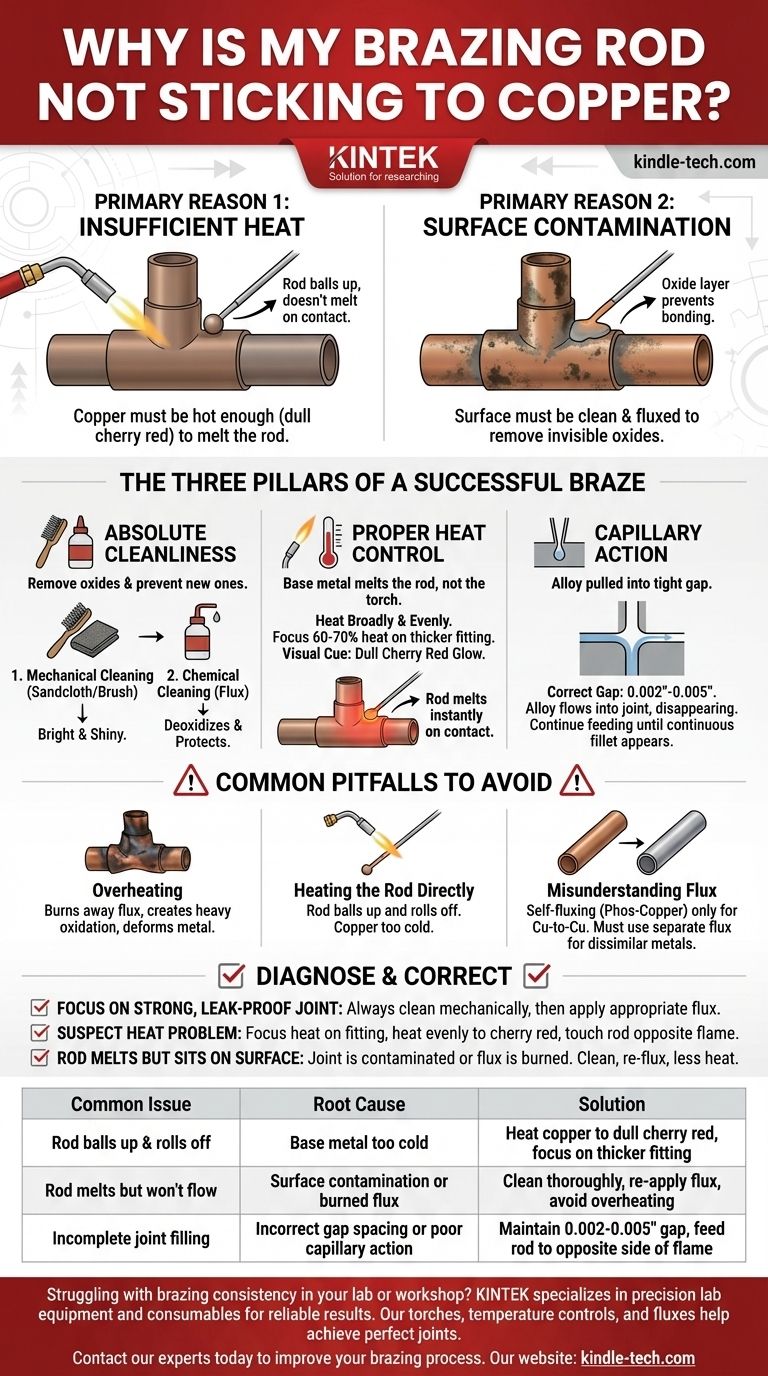
Ultimately, a brazing rod fails to stick to copper for two primary reasons: insufficient heat in the base metal or contamination on the surface. The copper itself must be hot enough—typically a dull cherry red—to melt the brazing rod on contact. If the surface is not perfectly clean and protected by flux, an invisible layer of oxide will form, preventing the molten filler alloy from bonding with the copper.
Brazing is not a process of "gluing" parts together with a melted rod. It is a metallurgical process where you create a superheated, clean environment that allows the base metal (copper) to melt the filler rod, pulling the alloy into the joint via capillary action to form a bond stronger than the copper itself.
The Three Pillars of a Successful Braze
To solve the "not sticking" problem, you must master three fundamental principles. Failure in any one of these areas will result in a failed joint.
Pillar 1: Absolute Cleanliness
Contamination is the silent enemy of a good braze. When copper is heated, it reacts with oxygen in the air almost instantly, forming a layer of copper oxide. Molten brazing alloy cannot and will not bond to this oxide layer.
Your first job is to remove all existing oxides and prevent new ones from forming. This is a two-step process: mechanical cleaning followed by chemical cleaning (flux).
- Mechanical Cleaning: Use sandcloth or a wire fitting brush to abrade the outside of the pipe and the inside of the fitting. The surfaces must be cleaned until they are uniformly bright and shiny, with no dark spots.
- Chemical Cleaning (Flux): After mechanical cleaning, apply a thin, even layer of an appropriate brazing flux to both surfaces. The flux acts as a deoxidizer, a temperature indicator, and a protective shield that prevents re-oxidation as you heat the joint.
Pillar 2: Proper Heat Control
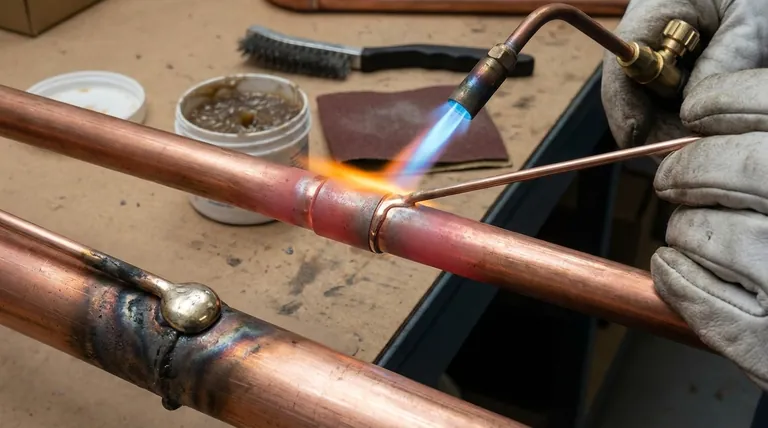
This is the most common point of failure for beginners. You do not melt the brazing rod with the torch flame. You heat the copper tube and fitting until they are hot enough to melt the rod on their own.
The correct technique involves heating the assembly broadly and evenly. Because a fitting is typically thicker and heavier than the tube, it requires more heat. Focus about 60-70% of your heat on the fitting to ensure the entire assembly reaches temperature at the same time.
The visual cue is color. Heat the copper until it glows a faint, dull cherry red. At this temperature, if you touch the brazing rod to the joint seam, the heat from the copper alone should melt it instantly.
Pillar 3: The Role of Capillary Action
If the joint is clean and the heat is correct, the final principle is capillary action. This is the physical force that pulls the liquid brazing alloy into the tight, uniform gap between the tube and the fitting.
For capillary action to work, the gap must be correct—typically between 0.002" and 0.005". If the gap is too tight, there is no room for the alloy to flow. If it's too loose, the capillary force is too weak to draw the filler in and distribute it completely.
When you introduce the rod to the hot joint, it should melt and immediately be pulled into the seam, disappearing from sight. You should continue feeding the rod until you see a continuous fillet (a thin ring of alloy) appear all the way around the joint.
Common Pitfalls to Avoid
Understanding what not to do is as important as knowing the correct procedure.
The Danger of Overheating
Applying too much heat is just as destructive as too little. Overheating burns away your protective flux, creates heavy, dark scaling (oxidation) that the flux can't remove, and can even melt or deform the copper. The goal is a controlled cherry red, not a bright orange glow.
The Mistake of Heating the Rod Directly
A classic beginner error is pointing the torch at the brazing rod to melt it, trying to "drip" it onto the joint. This results in the rod balling up and rolling off because the copper is too cold to allow the alloy to "wet" the surface and flow. The torch heats the parts; the parts melt the rod.
Misunderstanding Flux
Different brazing alloys have different flux requirements. For copper-to-copper joints, alloys containing phosphorus (like a 15% Phos-Copper rod) are self-fluxing, as the phosphorus acts as the deoxidizing agent. However, when brazing copper to a dissimilar metal like brass or steel, you must use a separate flux. Assuming an alloy is self-fluxing in the wrong situation guarantees failure.
Making the Right Choice for Your Goal
Use this checklist to diagnose and correct your technique.
- If your primary focus is a strong, leak-proof joint: Always start by mechanically cleaning the tube and fitting with sandcloth until they are uniformly bright, then apply a thin layer of the correct flux.
- If you suspect a heat problem: Focus the majority of your heat on the thicker fitting, heat the assembly evenly to a cherry red, and touch the rod to the joint opposite the flame. The copper itself should melt the rod instantly and pull it in.
- If the rod melts but just sits on the surface: Your joint is either contaminated or you have burned away your flux by overheating. Let it cool, clean it completely, re-apply flux, and try again with less heat.
Master the relationship between cleanliness and heat, and you will master the brazing process.
Summary Table:
| Common Issue | Root Cause | Solution |
|---|---|---|
| Rod balls up & rolls off | Base metal too cold | Heat copper to dull cherry red, focus on thicker fitting |
| Rod melts but won't flow | Surface contamination or burned flux | Clean thoroughly, re-apply flux, avoid overheating |
| Incomplete joint filling | Incorrect gap spacing or poor capillary action | Maintain 0.002-0.005" gap, feed rod to opposite side of flame |
Struggling with brazing consistency in your lab or workshop? KINTEK specializes in precision lab equipment and consumables that ensure reliable results. Our brazing torches, temperature controls, and high-purity fluxes help technicians and engineers achieve perfect joints every time.
Contact our experts today to discuss how KINTEK's solutions can improve your brazing process and deliver stronger, more reliable connections for your laboratory or manufacturing needs.
Visual Guide
Related Products
- Boron Nitride (BN) Ceramic Rod for High Temperature Applications
- Precision Machined Yttrium Stabilized Zirconia Ceramic Rod for Engineering Advanced Fine Ceramics
- Engineering Advanced Fine Alumina Al2O3 Ceramic Rod Insulated for Industrial Applications
- Custom PTFE Teflon Parts Manufacturer for PTFE Stirring Bar Recovery Rod
- Vacuum Heat Treat Sintering Brazing Furnace
People Also Ask
- Why use Boron Nitride (BN) crucibles in metal infiltration? Ensure sample purity and non-wetting performance.
- Why are Boron Nitride (BN) or Alumina crucibles preferred for Na-flux GaN growth? Optimize Your Crystal Yield
- What insulating materials can tolerate maximum temperature? Select the Right High-Temp Insulator for Your Application
- Why are Boron Nitride Tubes selected as reaction vessels for Na3SbS4? Ensure Purity in High-Temp Synthesis
- What is the function of a BN inner liner in a graphite mold during Flash Sintering? Master Precise Current Control