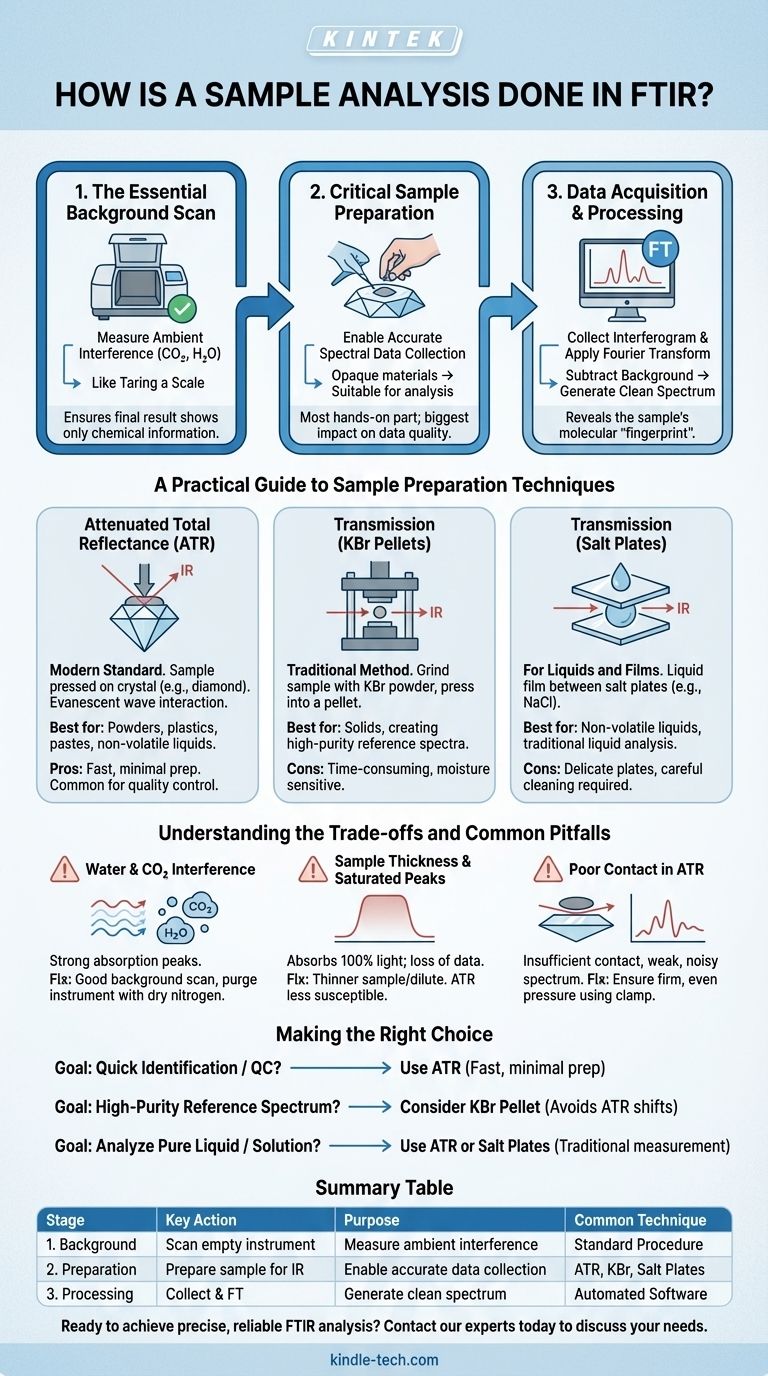
In practice, analyzing a sample with FTIR spectroscopy is a systematic three-stage process. First, you must capture a "background" spectrum of the empty instrument to account for ambient conditions. Next, you prepare and place your sample in the instrument to collect its unique spectrum. Finally, the instrument's software subtracts the background from the sample data to produce a clean spectrum for interpretation, which reveals the sample's molecular "fingerprint."
A successful FTIR analysis is less about the automated scan and more about the operator's actions before it begins. Meticulous sample preparation and a proper background scan are the two factors that determine whether you get a clear, interpretable result or a noisy, misleading one.
The Three Pillars of an FTIR Analysis
An FTIR analysis can be broken down into three fundamental stages. Understanding the purpose of each one is crucial for troubleshooting and achieving reliable results.
Pillar 1: The Essential Background Scan
Before analyzing any sample, you must first run a scan with nothing in the sample compartment. This is the background scan.
This step measures the infrared absorption of everything except your sample. This includes ambient carbon dioxide and water vapor in the air, as well as any signal originating from the instrument's own optics.
Think of this as taring a scale before weighing something. The instrument stores this background spectrum and automatically subtracts it from your sample's spectrum, ensuring the final result shows only the chemical information from your material.
Pillar 2: Critical Sample Preparation
For the FTIR instrument to work, the infrared beam must be able to pass through or interact with your sample. The goal of preparation is to make an opaque or difficult-to-handle material suitable for analysis.
The specific method depends entirely on the physical state of your sample (solid, liquid, or gas). This is often the most hands-on part of the process and has the biggest impact on data quality.
Pillar 3: Data Acquisition and Processing
Once the sample is in place, you initiate the scan. The instrument collects data as an interferogram—a complex signal that represents all the infrared frequencies simultaneously.
The instrument’s computer then performs a mathematical operation called a Fourier Transform (the "FT" in FTIR). This instantly converts the interferogram into the familiar spectrum: a plot of absorption intensity versus wavenumber (cm⁻¹). It is at this stage that the previously collected background is subtracted.
A Practical Guide to Sample Preparation Techniques
Choosing the right preparation technique is the most important decision you will make. The vast majority of modern analyses use Attenuated Total Reflectance (ATR).
Attenuated Total Reflectance (ATR): The Modern Standard
ATR is the easiest and most common method today. The sample (either solid or liquid) is simply pressed firmly against a small, durable crystal, typically diamond.
The IR beam is contained within the crystal, but a tiny, shallow wave of energy (an "evanescent wave") penetrates about 1-2 micrometers into the sample's surface. This interaction is enough to generate a high-quality spectrum.
ATR is favored for its speed and minimal sample prep. It works exceptionally well for powders, plastics, pastes, and non-volatile liquids.
Transmission (KBr Pellets): The Traditional Method
The classic technique for solids involves grinding a tiny amount of sample with dry potassium bromide (KBr) powder, which is transparent to infrared light.
This mixture is then pressed under high pressure in a die to form a small, translucent pellet. The IR beam passes directly through this pellet. This method produces excellent spectra but is time-consuming and highly sensitive to moisture.
Transmission (Salt Plates): For Liquids and Films
To analyze a liquid via transmission, a single drop is placed between two polished salt plates (often made of sodium chloride, NaCl). The plates are pressed together to create a very thin film of liquid.
The assembly is placed in the spectrometer, and the IR beam passes through it. This method is simple for non-volatile liquids but requires careful cleaning of the delicate, water-soluble plates.
Understanding the Trade-offs and Common Pitfalls
While powerful, FTIR analysis is not without its challenges. Recognizing these common issues is key to obtaining good data.
The Problem of Water and CO2
Atmospheric water vapor and carbon dioxide absorb IR light very strongly. You will see sharp, distinct peaks from CO2 (~2350 cm⁻¹) and a complex series of sharp lines from water vapor (around 3600 cm⁻¹ and 1600 cm⁻¹).
A good background scan will remove most of this, but if the lab's humidity or CO2 levels change between the background and sample scan, these peaks can reappear as artifacts. Many labs purge the instrument's sample compartment with dry nitrogen to eliminate this problem entirely.
Sample Thickness and Saturated Peaks
If your sample is too thick or too concentrated, it will absorb 100% of the light at its strongest absorption frequencies. This results in "flat-topped" or saturated peaks, where you lose all quantitative information.
If you see this in transmission mode, you must make the sample thinner or dilute it. One of the main advantages of ATR is that its shallow penetration depth makes saturated peaks much less common.
Poor Contact in ATR
The most common failure mode for ATR is insufficient contact between the sample and the crystal. This is especially true for hard, irregular solids.
Poor contact results in a very weak, noisy spectrum with distorted peak shapes. The solution is to ensure the sample is pressed firmly and evenly onto the crystal using the instrument's pressure clamp.
Making the Right Choice for Your Goal
Your analytical goal should dictate your approach to the analysis.
- If your primary focus is quick identification or quality control: Use ATR. Its speed, ease of use, and minimal sample preparation are ideal for rapidly confirming the identity of raw materials or finished products.
- If your primary focus is creating a high-purity reference spectrum: Consider a KBr pellet or other transmission method. These traditional techniques avoid the subtle peak shifts that can occur with ATR, making them valuable for building spectral libraries.
- If your primary focus is analyzing a pure liquid or solution: Use either ATR for a quick analysis or transmission with salt plates for a more traditional measurement.
Ultimately, mastering FTIR is about transforming it from a black box into a powerful tool for chemical discovery.
Summary Table:
| Stage | Key Action | Purpose | Common Technique |
|---|---|---|---|
| 1. Background Scan | Run scan with empty instrument | Measure ambient interference (CO₂, H₂O) | Standard instrument procedure |
| 2. Sample Preparation | Prepare sample for IR beam interaction | Enable accurate spectral data collection | ATR (solids/liquids), KBr Pellet (solids), Salt Plates (liquids) |
| 3. Data Acquisition & Processing | Collect sample data and apply Fourier Transform | Generate clean, interpretable spectrum | Automated software analysis |
Ready to achieve precise, reliable FTIR analysis in your lab?
KINTEK specializes in providing high-quality FTIR equipment and consumables—including durable ATR crystals, KBr powder, and salt plates—to ensure your sample preparation and analysis are flawless. Our expertise supports laboratories in chemical discovery, quality control, and material identification.
Contact our experts today to discuss your specific FTIR needs and enhance your analytical capabilities!
Visual Guide
Related Products
- XRF & KBR plastic ring lab Powder Pellet Pressing Mold for FTIR
- XRF & KBR steel ring lab Powder Pellet Pressing Mold for FTIR
People Also Ask
- What is the XRF pressed pellet method? A Fast, Cost-Effective Sample Prep Guide
- What is the XRF method of sampling? Achieve Accurate Elemental Analysis with Proper Sample Prep
- Why is a laboratory pellet press used before pyrolysis? Optimize Heat Transfer & Consistency in Porous Carbon Synthesis
- How does the selection of a pressure mold affect the performance of all-solid-state batteries? Expert Pelletizing Guide
- What is the purpose of using potassium bromide KBr in the FTIR measurement? Achieve Clear, Accurate Solid Sample Analysis

