Table of Contents
- Introduction to Handheld Coating Thickness Gauges
- Types of Handheld Coating Thickness Gauges
- Choosing the Right Handheld Gauge for Your Application
- Advanced Features and Technologies in Handheld Gauges
- Practical Tips for Using Handheld Coating Thickness Gauges
- Future Trends in Handheld Coating Thickness Measurement
- Conclusion and Recommendations
Introduction to Handheld Coating Thickness Gauges
Handheld coating thickness gauges play a vital role in ensuring quality and compliance with industry standards in various sectors, including electroplating, automotive, and industrial applications. This guide delves into the intricacies of these instruments, exploring their types, principles, and applications. It also provides practical tips for effective usage, case studies of successful implementations, and insights into future trends in coating thickness measurement. By mastering the use of handheld gauges, readers can enhance quality control, reduce costs, and optimize their processes. This comprehensive guide serves as an invaluable resource for anyone involved in coating thickness measurement and quality assurance.
Types of Handheld Coating Thickness Gauges
Handheld coating thickness gauges are essential tools in various industries, including electroplating, automotive, and industrial painting. These gauges ensure the precise measurement of coating thickness, which is crucial for the durability and performance of the coated materials. There are three primary types of handheld coating thickness gauges: magnetic, eddy current, and ultrasonic. Each method has its unique principles and applications, making them suitable for different materials and coating types.

Magnetic Gauges
Magnetic gauges are primarily used for measuring the thickness of non-magnetic coatings on magnetic substrates such as steel and iron. These gauges work on the principle of magnetic attraction or magnetic induction. In the magnetic attraction method, the gauge measures the distance between the probe and the substrate by the strength of the magnetic force. The magnetic induction method, on the other hand, measures the change in magnetic field caused by the coating's thickness. Magnetic gauges are highly accurate and are ideal for applications where the substrate is ferromagnetic.
Eddy Current Gauges
Eddy current gauges are designed to measure the thickness of non-conductive coatings on conductive metal substrates. These gauges operate by generating an electromagnetic field that induces eddy currents in the conductive substrate. The strength of these currents is inversely proportional to the distance between the probe and the substrate, allowing for accurate measurement of coating thickness. Eddy current gauges are suitable for non-ferromagnetic metals like aluminum and copper and are less accurate compared to magnetic gauges.
Ultrasonic Gauges
Ultrasonic gauges use the principle of ultrasonic pulse reflection to measure the thickness of coatings. These gauges emit ultrasonic pulses from a probe, which travel through the coating and are reflected back when they reach the substrate interface. By measuring the time it takes for the pulse to travel and return, the gauge can calculate the coating's thickness. Ultrasonic gauges are versatile and can be used on a wide range of materials, including metals, plastics, and composites. They are particularly useful for measuring the thickness of coatings on complex geometries or where other methods may not be applicable.
Applications and Suitability
Each type of coating thickness gauge is best suited for specific applications based on the material and the type of coating. Magnetic gauges are ideal for industries dealing with steel and iron substrates, such as automotive and construction. Eddy current gauges are more applicable in aerospace and electronics, where non-ferromagnetic metals are prevalent. Ultrasonic gauges find their use in a broader range of industries due to their versatility and ability to measure thickness on various substrates and geometries.
In conclusion, the choice of a handheld coating thickness gauge depends on the specific requirements of the application, including the type of substrate and coating, the required accuracy, and the operational environment. By understanding the principles and applications of magnetic, eddy current, and ultrasonic gauges, industries can ensure the quality and durability of their coatings, thereby enhancing the performance and longevity of their products.
Choosing the Right Handheld Gauge for Your Application
Selecting the appropriate handheld gauge for measuring coating thickness is crucial for ensuring the quality and performance of coatings across various industries. The choice of gauge depends on several factors, including the type of coating, the substrate material, and the required precision.
Understanding Coating and Substrate Types
Different coatings require different measurement techniques. For instance, electroplated materials and metallic coatings on magnetic substrates can be measured using magnetic induction or eddy current methods. These methods are effective for coatings like paint, plastic, ceramic, and rubber on materials such as steel and iron. On the other hand, non-magnetic coatings on non-magnetic metal substrates, such as enamel or rubber on copper, aluminum, or zinc, require alternative measurement techniques such as ultrasonic or X-ray fluorescence (XRF).
Precision and Measurement Range
The precision of the gauge is a critical factor, especially in industries where even minor deviations in coating thickness can significantly impact product performance. Handheld XRF instruments, for example, can measure metal or alloy coatings with a thickness ranging from 0.001μm to 50μm, making them suitable for a wide array of applications. Ultrasonic thickness gauges, meanwhile, are effective for measuring the thickness of various materials based on the time it takes for ultrasonic waves to travel through them.
Portability and Ease of Use
Handheld gauges are preferred for their portability, allowing for measurements to be taken directly on large or heavy parts that cannot be easily moved or placed under a benchtop instrument. This feature is particularly beneficial for in-service inspections and supply chain monitoring. The ease of use is also a significant consideration, as instruments that are simple to operate can reduce the likelihood of user error and improve the efficiency of the measurement process.
Comparing Benchtop and Handheld XRF Instruments
While both benchtop and handheld XRF instruments can measure coating thickness and composition, they differ in their capabilities and applications. Benchtop XRF analyzers offer higher precision and are better suited for complex multi-layer coating applications due to their ability to measure thicker coatings. They can be equipped with advanced features like motorized sample stages and calibration tools for repeatable positioning. Handheld XRF instruments, however, excel in their portability and ability to measure parts that are too large or heavy for benchtop instruments.
Aperture Technologies: Capillary Optics vs. Collimators
The choice between capillary optics and collimators in benchtop XRF spectrometers depends on the size of the part or component and the coating thickness that needs to be analyzed. Collimators are typically used for larger parts or thicker coatings, while capillary optics are more suitable for smaller parts or thinner coatings.
Operational Considerations
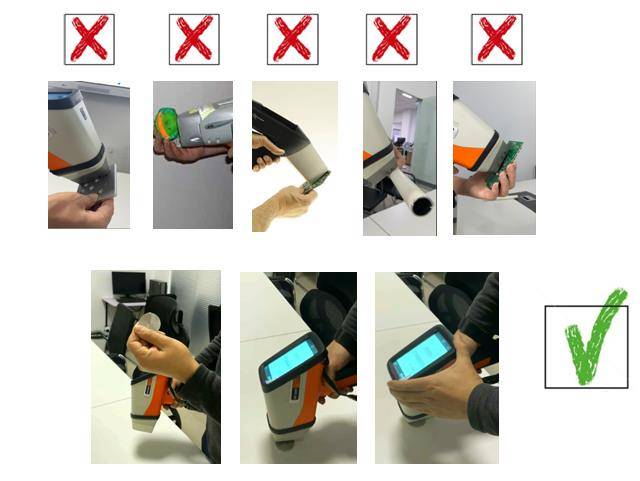
When using handheld coating thickness gauges, it is important to consider factors such as the magnetic properties of the base metal, the surface curvature, and the minimum thickness of the substrate. Proper calibration and operation techniques, including the correct orientation and pressure of the probe, are essential to ensure accurate measurements.
In conclusion, choosing the right handheld gauge for your application involves a careful consideration of the coating and substrate types, the required precision, and the operational environment. By selecting a gauge that aligns with these factors, you can ensure accurate and reliable measurements that meet the specific needs of your industry.
Advanced Features and Technologies in Handheld Gauges
Handheld gauges have revolutionized the field of coating thickness measurement, offering advanced features and technologies that enhance accuracy and efficiency. One of the key technologies integrated into these devices is X-ray fluorescence (XRF). XRF technology allows for non-destructive testing of metal or alloy coatings with thicknesses ranging from approximately 0.001μm to 50μm (0.05-2000μin), irrespective of the substrate material, which can be metal, polymer, ceramic, or glass.
Benchtop vs. Handheld XRF Instruments
Benchtop XRF spectrometers are ideal for measuring the coating thickness and composition of single and multi-layer coatings on small parts or specific areas on large parts. They can be equipped with high-precision motorized sample stages, adjustable lighting, and zoomable cameras, enhancing their capability for automated and repeatable measurements. However, their setup requires the parts to be placed under the instrument, which might not be feasible for large or heavy parts.
On the other hand, handheld XRF instruments offer unparalleled portability and are designed to measure coating thickness and composition on large parts directly on-site. They are particularly useful for in-service inspections and supply chain monitoring, where bringing the part to the instrument is impractical. Despite their portability, handheld devices typically measure thinner coatings compared to benchtop instruments, making them less suitable for complex multi-layer coating applications.
Capillary Optics vs. Collimators
The choice between capillary optics and collimators in benchtop XRF spectrometers depends on the size of the part or component and the coating thickness to be analyzed. Collimators, available in circular and rectangular forms, are suitable for parts as small as about 100μm (4mil) and can optimize precision while enabling fast analysis. They are commonly used in handheld XRF analyzers with spot sizes of about 1-3mm.
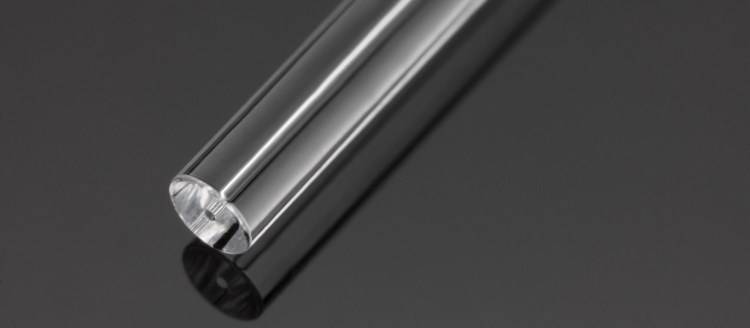
Capillary optics, on the other hand, are ideal for parts smaller than 100μm (4mil) and for coating applications at the nanometer scale. These optics use special glass tubes in a tapered structure to focus X-rays onto a smaller spot, enhancing precision for minute test points. This technology is crucial for achieving detailed analysis of thin coatings.
Electromagnetic Induction Coating Thickness Gauges
Another technology used in handheld coating thickness gauges is electromagnetic induction, which employs magnetic induction or eddy current technology to measure the thickness of organic coatings and anodized layers. These gauges are particularly useful for measuring larger parts (greater than about 5 mm or 0.2 inches) and can be a complementary tool to XRF analyzers, helping to meet various industry specifications such as ASTM B499, ASTM E376, and ASTM B244.
Conclusion
The integration of advanced technologies like XRF, capillary optics, and electromagnetic induction into handheld gauges has significantly improved the efficiency and accuracy of coating thickness measurements. These technologies not only facilitate on-site analysis but also ensure that measurements comply with international standards such as ASTM B568, ISO 3497, and DIN 50987. As the demand for precise and efficient coating analysis continues to grow, the advancements in handheld gauge technologies will undoubtedly play a crucial role in meeting these industry needs.
Practical Tips for Using Handheld Coating Thickness Gauges
Handheld coating thickness gauges are essential tools in the coating industry, offering non-destructive measurement of the thickness of dry film paint on various surfaces. These instruments are particularly valuable as they do not damage the material being tested, making the measurement process both simple and convenient. Here, we will explore practical advice on how to effectively use these gauges, focusing on calibration, maintenance, and troubleshooting common issues, as well as the importance of proper handling and storage to maintain instrument accuracy.
Calibration and Measurement Accuracy
The accuracy of a coating thickness gauge is paramount, and proper calibration is the first step in ensuring reliable measurements. Each gauge has specific requirements for calibration, often involving the use of standard calibration foils or plates that match the expected range of coatings to be measured. It is crucial to calibrate the gauge in an environment similar to where it will be used, as factors like temperature and humidity can affect the readings.
When measuring, it is important to select the correct probe type for the coating and substrate being tested. For instance, magnetic gauges are used for non-magnetic coatings on magnetic substrates, while eddy current gauges are used for non-conductive coatings on non-magnetic metal substrates. Ensuring the probe is clean and free from debris can also prevent measurement errors.
Maintenance and Troubleshooting
Regular maintenance of handheld coating thickness gauges is essential to keep them functioning optimally. This includes cleaning the probe and the gauge body, checking for any physical damage, and ensuring that the battery is in good condition. If the gauge is not providing accurate readings, it may need recalibration or repair. Common issues include probe wear, battery failure, and damage to the gauge's internal components.
Proper Handling and Storage
To maintain the accuracy of the coating thickness gauge, it is important to handle it with care. Avoid dropping the gauge or subjecting it to strong impacts, as this can damage the sensitive internal components. When not in use, store the gauge in a dry, cool place away from direct sunlight and extreme temperatures. This helps prevent damage to the electronic components and prolongs the life of the gauge.
Application in Various Industries
Handheld coating thickness gauges are versatile tools used across various industries. In metal finishing, these gauges ensure that the thickness of electroplated or galvanized coatings is precisely controlled, preventing defects in the finished product. In the automotive industry, they are used to measure paint and powder coatings, ensuring not only aesthetic appeal but also providing important surface protection against wear and rust.
Conclusion
In conclusion, handheld coating thickness gauges are invaluable tools that require careful handling, regular maintenance, and proper calibration to ensure accurate and reliable measurements. By adhering to these practical tips, users can maximize the effectiveness of their gauges and ensure the quality of coatings across various applications. Whether in industrial settings or automotive paint shops, these instruments play a crucial role in maintaining the integrity and performance of coated surfaces.
Future Trends in Handheld Coating Thickness Measurement
The field of coating thickness measurement is rapidly evolving, driven by advancements in sensor technology, data analysis, and integration with other quality control systems. Handheld alloy analyzers, once primarily used for material composition analysis, are now increasingly utilized for measuring coating thickness across various industries.
Advancements in Sensor Technology
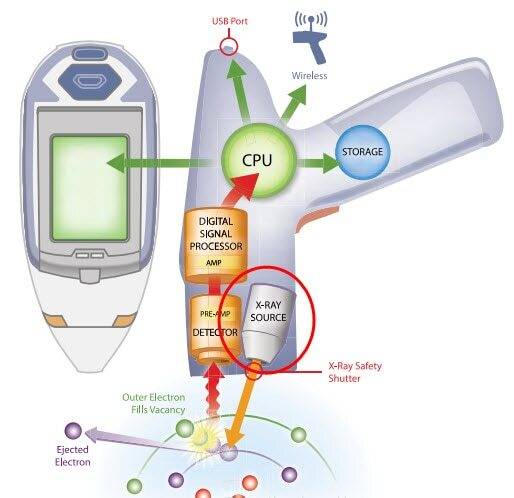
Handheld alloy analyzers equipped with X-ray fluorescence (XRF) technology are at the forefront of coating thickness measurement. These devices can accurately measure the thickness of metal, plastic, glass, and even wood coatings. The use of XRF technology allows for non-destructive testing, providing results within seconds without damaging the test material. This efficiency is crucial in production environments where quality control is paramount.
Recent developments in aperture technologies, such as capillary optics and collimators, have enhanced the precision and versatility of handheld XRF analyzers. Capillary optics are particularly effective for analyzing coatings at the nanometer scale, making them ideal for applications requiring high precision. Conversely, collimators offer a range of spot sizes, optimizing precision for larger parts or areas.
Integration with Quality Control Systems
The integration of handheld coating thickness measurement devices with broader quality control systems is a significant trend. These devices can now seamlessly interface with data management systems, allowing for real-time monitoring and analysis of coating thickness across multiple production stages. This integration not only enhances the efficiency of the coating process but also ensures compliance with industry standards such as ASTM B568, ISO 3497, and DIN 50987.
Data Analysis and Reporting
Advances in data analysis tools are transforming how coating thickness data is interpreted and utilized. Modern handheld analyzers come equipped with sophisticated software that can analyze data, generate reports, and identify trends or anomalies in coating thickness. This capability is invaluable for predictive maintenance and process optimization, helping manufacturers to proactively address potential issues before they impact product quality.
Electromagnetic Induction Gauges
Complementary to XRF technology, electromagnetic induction gauges offer another method for measuring coating thickness, particularly suitable for larger parts. These gauges use magnetic induction or eddy current technology to measure the thickness of organic coatings and anodized layers. The integration of these gauges with XRF analyzers provides a comprehensive solution for coating thickness measurement across various materials and applications.
Future Outlook
Looking ahead, the future of handheld coating thickness measurement is likely to see further advancements in miniaturization, automation, and connectivity. Innovations in sensor technology will continue to improve the accuracy and speed of measurements, while enhanced connectivity will allow for more sophisticated integration with manufacturing processes and quality control systems.
In conclusion, the evolution of handheld coating thickness measurement technology is a testament to the dynamic nature of industrial quality control. As these devices become more sophisticated and integrated, they will play an increasingly vital role in ensuring the quality and reliability of coated products across a wide range of industries.
Conclusion and Recommendations
In conclusion, mastering handheld coating thickness gauges is essential for ensuring quality and efficiency in various industries. By understanding the different types of gauges, selecting the right gauge for specific applications, and utilizing advanced features and technologies, companies can achieve accurate and reliable coating thickness measurements. Implementing practical tips and best practices for using handheld gauges, as well as learning from case studies and staying informed about future trends, will further enhance coating thickness measurement capabilities. For those looking to deepen their understanding, further reading and exploration of resources on the topic are recommended.
Related Products
- XRD Sample Holder X-ray Diffractometer Powder Slide
- Customizable XRD Sample Holders for Diverse Research Applications
Related Articles
- Techniques for Sample Preparation in X-Ray Fluorescence Analysis: Pressed and Loose Powder Methods
- Revolutionizing Mining and Exploration: The Ultimate Guide to Handheld XRF Analyzers
- X-Ray Fluorescence Spectrometer: Powder Compression Method for Sample Preparation
- How To Turn XRF analysis sample preparation Into Success
- Revolutionizing Hardrock Mining: The Ultimate Guide to Handheld XRF Analyzers

