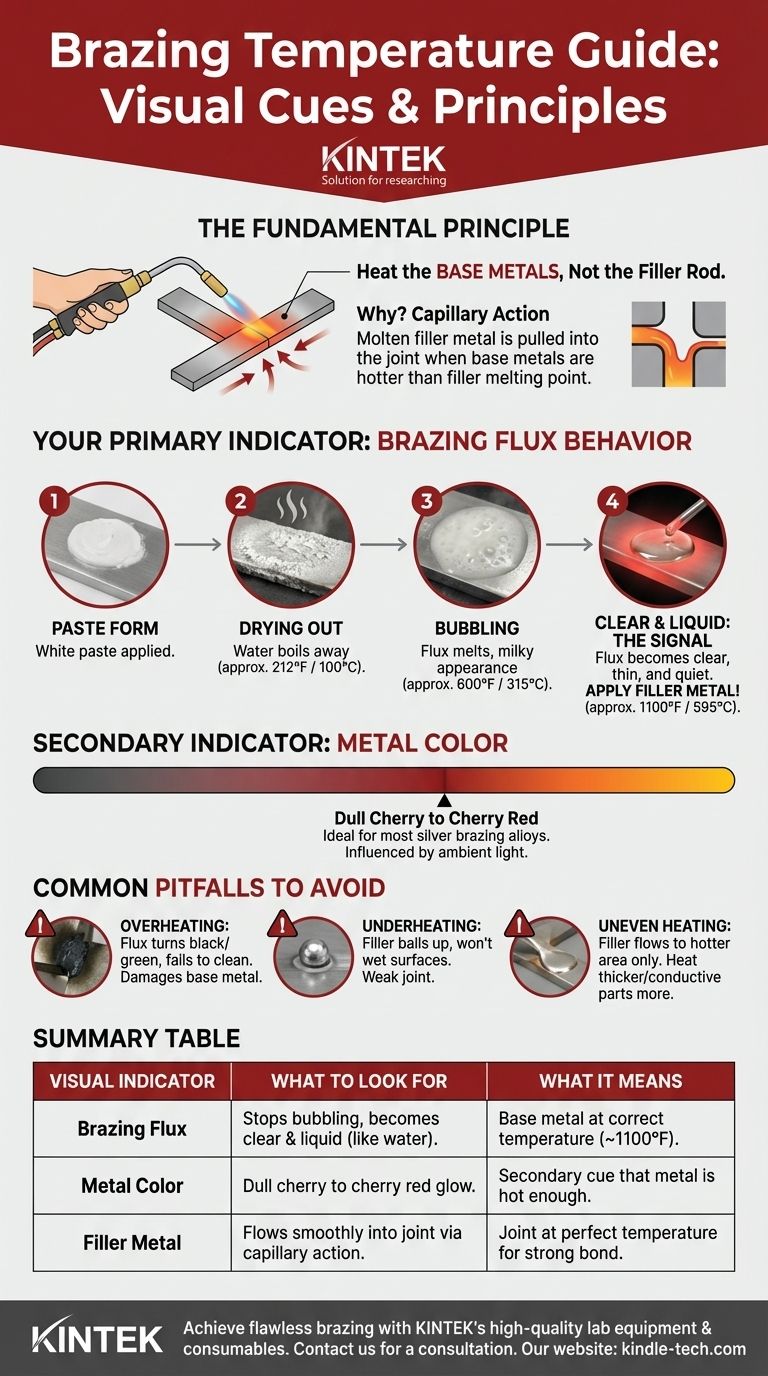
Determining the correct brazing temperature is a matter of observation, not guesswork. The most reliable visual indicator is the brazing flux. When the flux applied to your workpiece stops bubbling and becomes completely clear and liquid, like water, the base metal has reached the proper temperature to accept the filler metal.
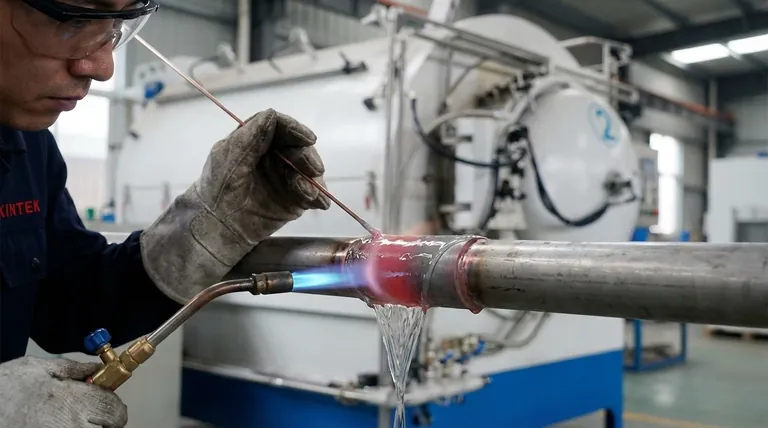
The core principle of brazing is to heat the base metals, not the filler rod. The joint itself must be hot enough to melt the filler metal on contact, allowing capillary action to draw it in for a strong bond. Your flux is the most accurate thermometer you have.
The Fundamental Principle: Let the Base Metal Do the Work
Brazing creates a powerful metallurgical bond, but only when the temperature and heating process are managed correctly. Understanding the "why" behind the process is critical.
Why Temperature is Everything
A successful braze relies on capillary action, the force that pulls the molten filler metal into the tight space between your workpieces. This can only happen when the surfaces of the base metals are hotter than the melting point of your filler.
If the base metal is too cold, the filler rod will simply melt from the torch's heat, ball up, and fail to flow into the joint. This results in a weak bond with no penetration.
The Role of the Torch
The purpose of the torch is to heat the base metals evenly and thoroughly. You should never point the flame directly at the filler rod to melt it.
Think of the base metal as the pan and the filler metal as butter. You heat the pan, and the pan melts the butter evenly across its surface. You would never point a blowtorch at a stick of butter to try and coat a cold pan.
Reading the Visual Cues: Flux and Color
Your eyes are the best tools for gauging temperature. You must learn to read the two primary indicators: the state of the flux and the color of the heated metal.
Your Primary Indicator: Brazing Flux Behavior
Flux is your most reliable guide. It goes through several distinct visual stages as it heats up, providing a clear roadmap to the correct brazing temperature.
- Paste Form: The flux is applied as a white paste.
- Drying Out: As heat is applied, the water in the flux boils away (around 212°F / 100°C), leaving a dry, crusty white coating.
- Bubbling: As the temperature rises further (around 600°F / 315°C), the flux will begin to bubble and melt, taking on a milky appearance.
- Clear & Liquid: Finally, as the metal approaches brazing temperature (around 1100°F / 595°C), the flux will become completely clear, thin, and quiet. It will look like a layer of water on the metal. This is the signal to apply the filler metal.
Your Secondary Indicator: The Color of the Metal
The visible color of the heated metal is also a useful, though less precise, indicator. Its appearance can be influenced by the ambient light in your workspace.
For most common silver brazing alloys, you are looking for a dull cherry to cherry red glow in the metal. If the metal is bright orange or yellow, you have likely gone far past the necessary temperature.
Common Pitfalls to Avoid
Achieving the right temperature is a balancing act. Both overheating and underheating will compromise the integrity of your joint.
The Danger of Overheating
Applying too much heat is a common mistake that can ruin your work.
Overheating destroys the flux, causing it to turn black or green. At this point, it loses its ability to clean the metal and protect it from oxidation, preventing the filler from flowing. It can also damage the base metals themselves.
The Problem of Underheating
If the joint is not hot enough, the filler metal will not "wet" the surfaces. It will refuse to flow into the joint, instead beading up on the surface where you apply it. This creates a weak joint that lacks the strength of a true braze.
The Mistake of Uneven Heating
Both pieces being joined must reach the target temperature at the same time. If one part is hotter than the other, the filler metal will flow exclusively towards the hotter area, starving the cooler side of the joint.
When joining metals of different thicknesses or types (like copper to steel), always focus more heat on the thicker or more thermally conductive piece.
A Practical Checklist for Your Next Braze
Use these guidelines to diagnose issues and ensure a successful outcome.
- If the filler metal balls up and won't flow: Your base metal is not hot enough. Remove the filler rod, continue heating the base metal until the flux is fully clear and liquid, then re-introduce the rod.
- If the flux turns black before you apply the filler: You are overheating the joint. Remove the heat, let the joint cool slightly, and approach the target temperature more slowly and with a softer flame.
- If you are brazing dissimilar metals (e.g., copper to steel): Focus the majority of your heat on the metal with higher thermal conductivity (copper in this case) to ensure both pieces reach temperature simultaneously.
Trust the flux, heat the part not the rod, and you will achieve a perfect braze.
Summary Table:
| Visual Indicator | What to Look For | What It Means |
|---|---|---|
| Brazing Flux | Stops bubbling, becomes clear and liquid like water. | Base metal is at correct brazing temperature (~1100°F / 595°C). |
| Metal Color | Dull cherry to cherry red glow. | Secondary indicator that the metal is hot enough (for silver brazing). |
| Filler Metal | Flows smoothly into the joint via capillary action. | Joint is at the perfect temperature for a strong bond. |
Achieve flawless, high-strength brazed joints every time with the right equipment and expertise.
KINTEK specializes in providing high-quality lab equipment and consumables for all your thermal processing needs. Whether you are in R&D, manufacturing, or maintenance, our brazing torches, furnaces, and temperature control solutions are designed to deliver precision and reliability.
Let us help you optimize your brazing process for superior results. Contact our experts today for a personalized consultation and discover how KINTEK can support your laboratory's success.
Visual Guide