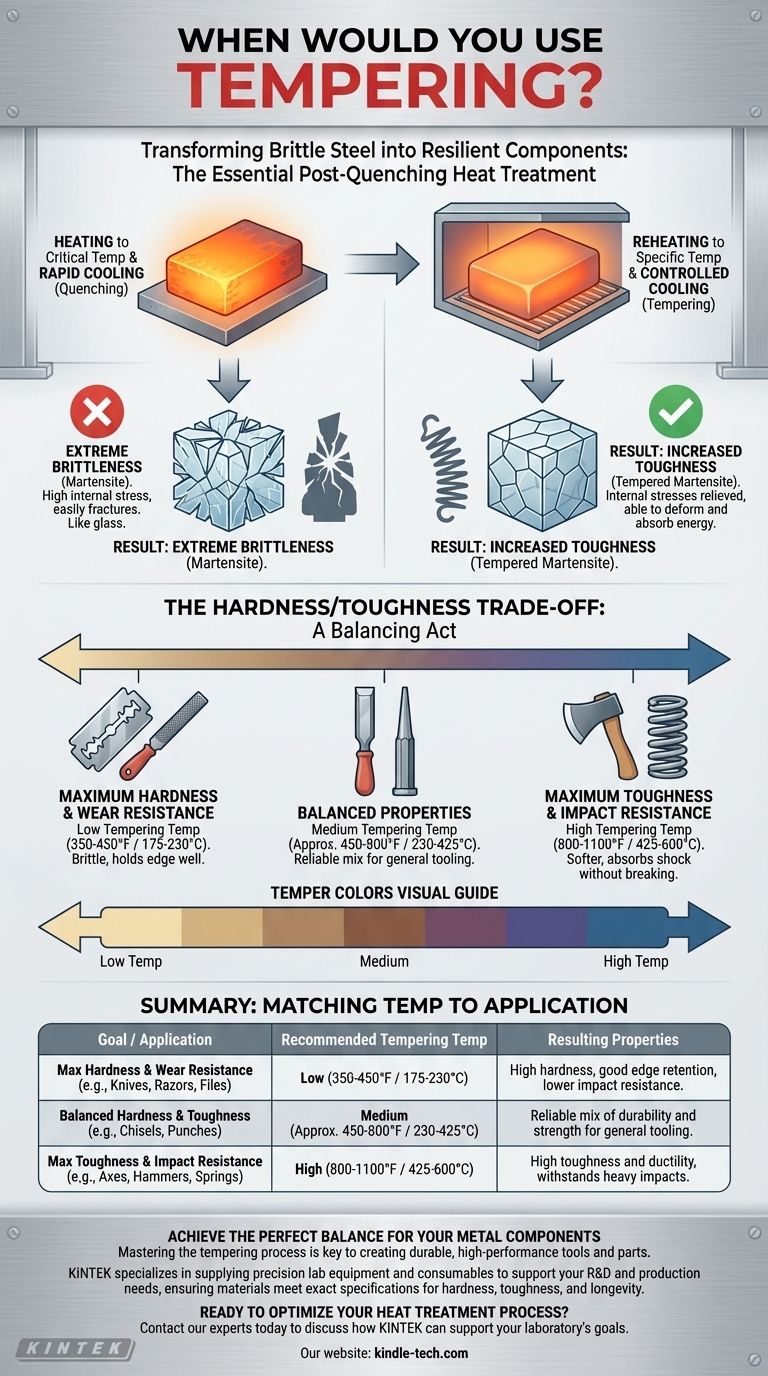
Tempering is used on hardened steel almost immediately after the initial hardening process known as quenching. It is an essential secondary heat treatment designed to solve the primary problem that quenching creates: extreme brittleness. By reheating the steel to a specific temperature, tempering reduces this brittleness and relieves internal stresses, trading a small amount of hardness for a significant and necessary increase in toughness.
The core reason to temper is to transform a hardened but uselessly brittle piece of steel into a resilient and durable component. You aren't just softening the metal; you are precisely tuning the trade-off between hardness and toughness to match the final application.

The Two-Step Process: Hardening and Tempering
To understand when to use tempering, you must first understand its relationship with hardening. They are two halves of the same fundamental process.
Step 1: Creating Maximum Hardness (Quenching)
The first step is to heat a high-carbon steel to a critical temperature and then cool it very rapidly, typically by plunging it into oil or water. This is called quenching.
This rapid cooling traps carbon atoms within the iron's crystal structure, forming a new, very hard, and highly strained microstructure called martensite.
The Problem with Hardness Alone: Extreme Brittleness
As-quenched martensitic steel is extremely hard, but it is also incredibly brittle, much like glass. It has immense internal stresses from the rapid transformation.
A piece of steel in this state is not suitable for most applications. A hammer blow or even a sharp shock could cause it to shatter catastrophically.
Step 2: Introducing Toughness (Tempering)
Tempering is the solution. The hardened steel is carefully reheated to a temperature well below the initial hardening temperature, held there for a specific time, and then allowed to cool.
This process does not make the steel soft again. Instead, it provides just enough energy to allow the internal stresses to relax and the microstructure to change slightly, dramatically increasing its toughness—its ability to deform and absorb energy without fracturing.
How Tempering Works: The Microscopic View
The temperature used during the tempering cycle is the most critical variable, as it dictates the final properties of the steel.
Relieving Internal Stress
The primary effect of tempering is stress relief. The heat allows the atoms in the highly strained martensite structure to rearrange into a more stable configuration, reducing the risk of cracking.
The Role of Temperature
The specific temperature determines the final balance of hardness and toughness.
- Low Temperatures (approx. 350-450°F / 175-230°C): These temperatures produce minimal softening but significantly increase toughness. This is ideal for tools that need maximum hardness and wear resistance, like files or knife blades.
- High Temperatures (approx. 800-1100°F / 425-600°C): These temperatures sacrifice more hardness for a very large gain in toughness and ductility. This is necessary for components that must withstand heavy impacts or flexing, such as springs, axes, or structural bolts.
Reading the Colors
As steel is heated, a thin oxide layer forms on its surface. The thickness of this layer corresponds to the temperature and creates visible colors, ranging from a light straw yellow at low temperatures to purple and deep blue at higher temperatures. For centuries, blacksmiths have used these temper colors as a reliable visual guide to gauge the temperature and achieve the desired properties.
Understanding the Trade-offs: Hardness vs. Toughness
The relationship between hardness and toughness is the central challenge in metallurgy. Tempering is the primary tool for managing this trade-off.
The Hardness/Toughness Spectrum
You can almost never maximize both hardness and toughness simultaneously. A material that is extremely hard will resist scratching and wear, but it will be brittle. A material that is very tough will absorb impact, but it will be softer and wear more quickly.
Tempering allows you to precisely position a component on this spectrum according to its intended use.
Example: A Razor vs. A Spring
A razor needs to hold a razor-sharp edge, which requires extreme hardness. It is tempered at a very low temperature to preserve as much hardness as possible. It is hard, but it is also brittle and would snap if bent.
A car's leaf spring must flex millions of times and absorb road shock without breaking. It requires maximum toughness. It is tempered at a much higher temperature, making it softer but incredibly resilient.
The Cost of Skipping Tempering
Failing to temper a hardened steel component is a common and dangerous mistake. The part may appear strong, but it is a brittle failure waiting to happen. Under load or impact, it will not bend or deform; it will simply shatter.
Making the Right Choice for Your Goal
Always temper a component after it has been hardened through quenching. The specific temperature you choose depends entirely on the job it needs to do.
- If your primary focus is edge retention or wear resistance (e.g., knives, files, razors): Use a lower tempering temperature (light straw to brown colors) to preserve maximum hardness.
- If your primary focus is impact resistance (e.g., axes, hammers, springs): Use a higher tempering temperature (purple to blue colors) to gain the necessary toughness, even at the cost of some hardness.
- If you need a general balance for tooling (e.g., chisels, punches, structural parts): Select a mid-range temperature that provides a reliable and durable mix of both properties.
Ultimately, tempering is the critical process that transforms a simply hard material into a truly resilient and useful tool.
Summary Table:
| Goal / Application | Recommended Tempering Temperature | Resulting Properties |
|---|---|---|
| Maximum Hardness & Wear Resistance (e.g., knives, razors, files) | Low (350-450°F / 175-230°C) | High hardness, good edge retention, but lower impact resistance. |
| Balanced Hardness & Toughness (e.g., chisels, punches) | Medium (Approx. 450-800°F / 230-425°C) | A reliable mix of durability and strength for general tooling. |
| Maximum Toughness & Impact Resistance (e.g., axes, hammers, springs) | High (800-1100°F / 425-600°C) | High toughness and ductility, able to withstand heavy impacts without fracturing. |
Achieve the Perfect Balance for Your Metal Components
Mastering the tempering process is key to creating durable, high-performance tools and parts. Whether you're developing laboratory equipment, custom tooling, or specialized components, the right heat treatment is critical.
KINTEK specializes in supplying precision lab equipment and consumables to support your R&D and production needs. Our expertise helps laboratories and manufacturers ensure their materials meet exact specifications for hardness, toughness, and longevity.
Ready to optimize your heat treatment process? Contact our experts today to discuss how KINTEK can support your laboratory's goals with reliable equipment and consumables.
Visual Guide
Related Products
- High Temperature Muffle Oven Furnace for Laboratory Debinding and Pre Sintering
- Vacuum Heat Treat Furnace with Ceramic Fiber Liner
- 1700℃ Controlled Atmosphere Furnace Nitrogen Inert Atmosphere Furnace
- Ultra-High Temperature Graphite Vacuum Graphitization Furnace
- 1400℃ Controlled Atmosphere Furnace with Nitrogen and Inert Atmosphere
People Also Ask
- What conditions does a muffle furnace provide for molten salt energy storage? Expert Simulation for CSP Environments
- Why is the annealing treatment in a high-temperature muffle furnace critical for the preparation of an Sb-SnO2 interlayer?
- What is the primary function of high-temperature muffle or tube furnaces for ceramic coatings? Ensure Peak Durability
- What role does a calcination furnace play in preparing hollow core-shell particles? Achieve Perfect Nano-Structures
- What are the main components of a high-temperature muffle furnace? A Guide to the Core Systems