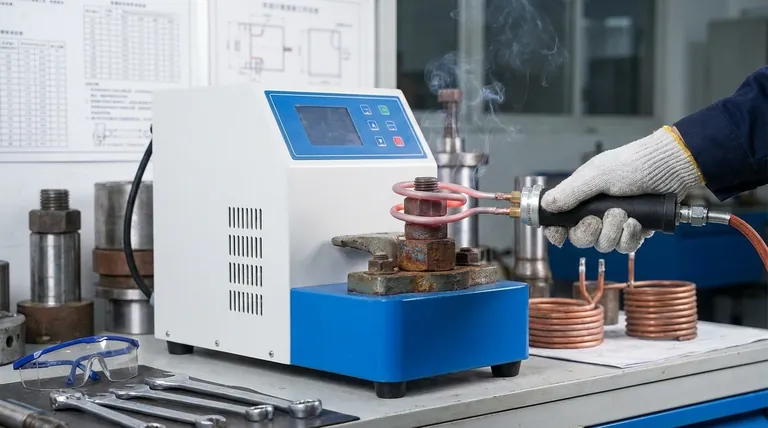
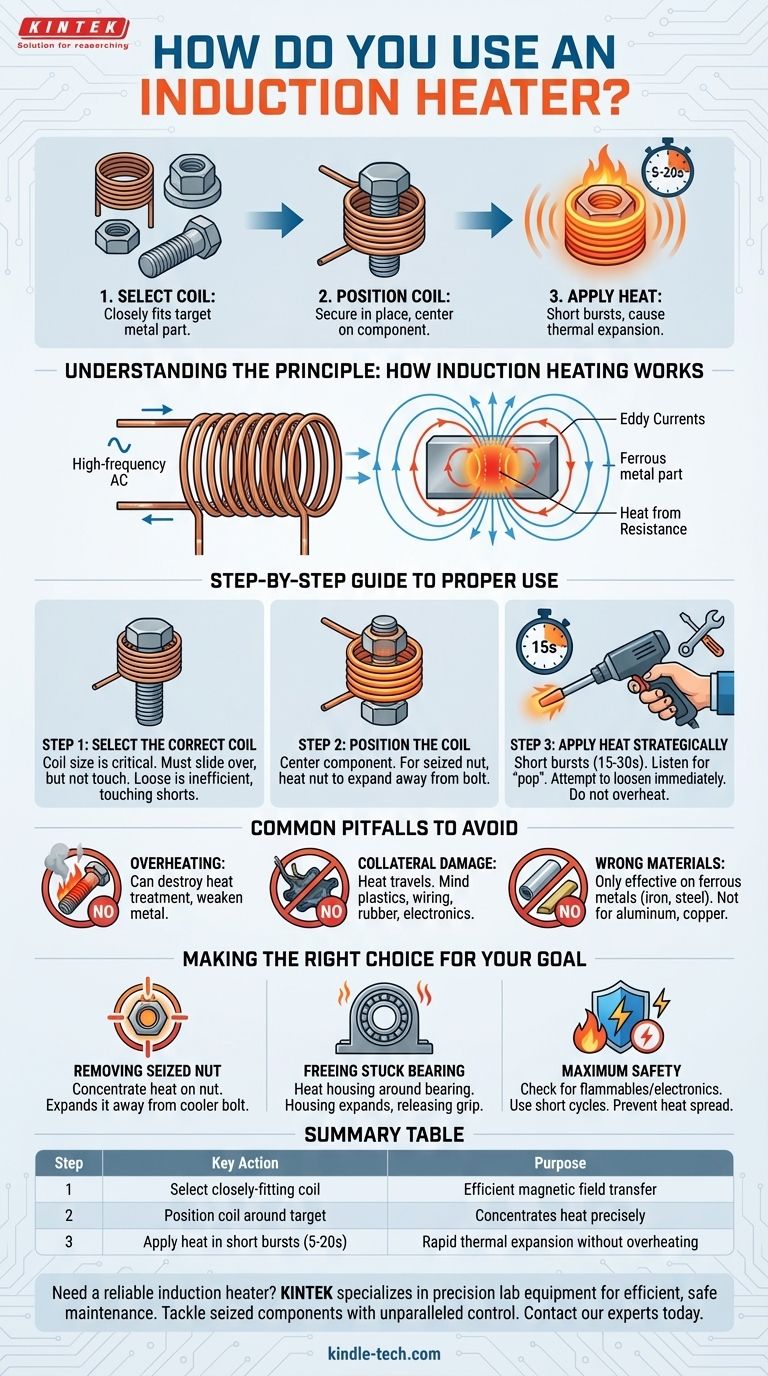
At its core, using an induction heater is a three-step process. You first select a coil that fits closely around your target metal part without touching it. Next, you secure the coil in place and activate the heater, which generates a powerful magnetic field. Finally, you apply this targeted heat for short bursts, typically 5-20 seconds, causing the metal to expand and break the bonds of rust or corrosion.
The fundamental goal of an induction heater isn't just to make metal hot; it's to induce rapid, precise thermal expansion in a targeted component. This allows you to break seized joints without the collateral damage and safety risks of an open flame.
Understanding the Principle: How Induction Heating Works
The Science of Targeted Heat
An induction heater does not produce a flame. Instead, the unit sends a high-frequency alternating current through a copper induction coil.
This current generates a powerful, rapidly changing magnetic field around the coil.
Inducing a Current in the Workpiece
When you place a ferrous (iron-based) metal part inside this magnetic field, the field induces electrical currents within the metal itself. These are known as eddy currents.
Heat from Resistance
The metal's natural resistance to the flow of these eddy currents generates intense and immediate heat. The heat is created inside the part, not applied externally, making the process incredibly fast and efficient.
A Step-by-Step Guide to Proper Use
Step 1: Select the Correct Coil
The size and shape of your coil are critical for performance. The coil must be large enough to slide over the part but small enough to maintain proximity.
A loose-fitting coil is inefficient, while a coil that touches the part can cause a short circuit. Most kits come with various pre-formed coils for common applications like nuts and bolts.
Step 2: Position the Coil for Maximum Effect
Center the component you want to heat within the coil. The goal is to heat the part evenly and quickly.
For a seized nut on a bolt, for example, you want to place the coil directly over the nut. This heats and expands the nut, breaking its grip on the bolt's threads.
Step 3: Apply Heat Strategically
Apply heat in short, controlled bursts. A cycle of 15-30 seconds is often enough for the part to expand sufficiently.
Listen for a "pop" or "crack," which can indicate the rust seal has broken. Immediately after heating, use a wrench to attempt to loosen the component while it is still expanded.
If the part doesn't break free, let it cool slightly and repeat the heating cycle. Applying continuous heat for minutes on end is unnecessary and risks damaging the component.
Common Pitfalls to Avoid
Overheating the Component
The goal is rapid expansion, not melting. Getting a fastener "cherry red" can destroy its heat treatment, permanently softening the metal and compromising its strength.
Ignoring Collateral Damage
While much safer than a torch, the intense heat can still travel. Be mindful of nearby plastic components, wiring, rubber bushings, or sensitive electronics like ABS sensors. The heat can also boil grease out of bearings and joints.
Using It on the Wrong Materials
Induction heating is only effective on ferrous metals—those that are magnetic, like iron and steel. It will not work on aluminum, copper, brass, or other non-ferrous materials.
Making the Right Choice for Your Goal
- If your primary focus is removing a seized nut: Concentrate heat solely on the nut. This expands it away from the cooler bolt, breaking the seizure with minimal effort.
- If your primary focus is freeing a stuck bearing: Heat the housing or steering knuckle around the bearing. The housing will expand, releasing its press-fit grip on the bearing race.
- If your primary focus is maximum safety: Always confirm there are no flammable lines or sensitive electronics near your heating zone, and use short, controlled heating cycles to prevent heat from spreading.
Mastering this tool allows you to perform difficult tasks with unparalleled precision and safety.
Summary Table:
| Step | Key Action | Purpose |
|---|---|---|
| 1 | Select a closely-fitting coil | Ensures efficient magnetic field transfer to the metal part |
| 2 | Position the coil around the target component | Concentrates heat precisely where needed (e.g., on a nut, not the bolt) |
| 3 | Apply heat in short bursts (5-20 seconds) | Causes rapid thermal expansion to break rust bonds without overheating |
Need a reliable induction heater for your workshop or laboratory? KINTEK specializes in precision lab equipment, including induction heating systems designed for efficient and safe maintenance tasks. Our solutions help you tackle seized components with unmatched control, protecting surrounding materials from heat damage. Contact our experts today to find the perfect induction heater for your specific needs!
Visual Guide
Related Products
- 600T Vacuum Induction Hot Press Furnace for Heat Treat and Sintering
- Infrared Heating Quantitative Flat Plate Press Mold
- Lab-Scale Vacuum Induction Melting Furnace
- Silicon Carbide SiC Thermal Heating Elements for Electric Furnace
- Laboratory Small Constant Temperature Heated Magnetic Stirrer Heater and Stirrer
People Also Ask
- What role does mechanical pressure play during the vacuum diffusion bonding of tungsten and copper? Keys to Solid Bonding
- What is the application value of a vacuum hot press furnace? Unlock High-Density Complex Carbide Ceramics
- What role does a Vacuum Hot Press (VHP) furnace play in the densification of austenitic stainless steel 316 composites?
- What advantages does a vacuum hot press furnace provide for LSLBO ceramic electrolytes? Achieve 94% Relative Density
- What are the advantages of a vacuum hot press furnace for W-50%Cu? Achieve 99.6% Density at Lower Temperatures