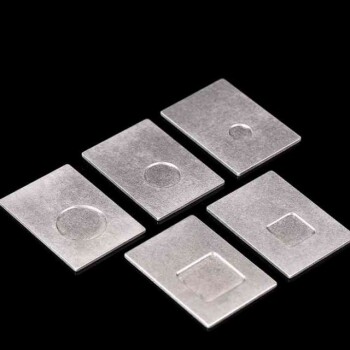
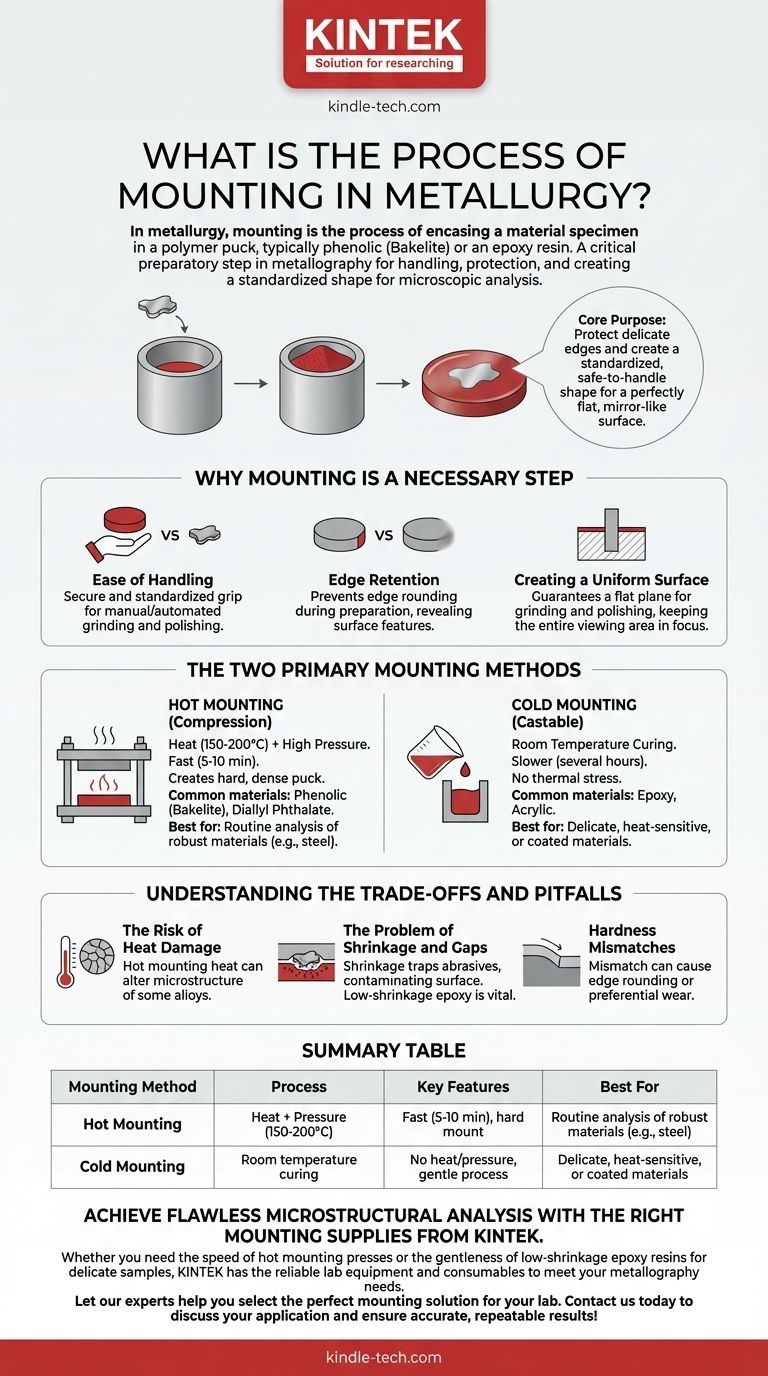
In metallurgy, mounting is the process of encasing a material specimen in a polymer puck, typically phenolic (Bakelite) or an epoxy resin. This is not a manufacturing process but a critical preparatory step in metallography, the science of studying a material's microstructure. Its purpose is to make a small or irregularly shaped sample easy to handle for subsequent grinding, polishing, and microscopic examination.
The core purpose of mounting is to protect the specimen's delicate edges and create a standardized, safe-to-handle shape. This ensures the sample can be ground and polished to a perfectly flat, mirror-like surface, which is essential for accurate microstructural analysis under a microscope.
Why Mounting is a Necessary Step
Before a metal's internal structure can be analyzed, it must be prepared. Mounting is the foundational step that makes all subsequent stages possible and reliable.
Ease of Handling
A small piece of metal, a wire, or a fracture surface is difficult and unsafe to hold by hand against a high-speed grinding wheel or polishing cloth. Encasing it in a larger polymer puck provides a secure and standardized grip for both manual and automated preparation.
Edge Retention
One of the most critical goals is to examine the material all the way to its edge. Without the support of a mounting compound, the edges of the specimen would round off during grinding and polishing, obscuring important surface features or case-hardened layers.
Creating a Uniform Surface
Mounting ensures the specimen is held perpendicular to the surface being prepared. This guarantees a flat, even plane for grinding and polishing, which is crucial for keeping the entire viewing area in focus under a microscope.
The Two Primary Mounting Methods
The choice between mounting techniques depends entirely on the nature of the material being analyzed and the required speed of the process.
Hot Mounting (Compression Mounting)
This is the most common method for routine analysis. The specimen is placed in a cylindrical chamber with a granular thermosetting polymer, like phenolic (Bakelite) or diallyl phthalate.
The machine then applies both heat (around 150-200°C) and high pressure to melt the polymer and cure it into a hard, dense puck around the sample. The entire process is fast, typically taking 5-10 minutes.
Cold Mounting (Castable Mounting)
This method is used for specimens that are sensitive to heat or pressure. Materials that have been heat-treated, have delicate coatings, or are prone to thermal damage require this gentler approach.
The process involves placing the specimen in a mold and pouring a liquid two-part resin (epoxy or acrylic) over it. The resin then cures at room temperature over several hours. While slower, it induces no thermal stress on the sample.
Understanding the Trade-offs and Pitfalls
Selecting the wrong method or material can introduce artifacts that lead to incorrect analysis.
The Risk of Heat Damage
The primary trade-off is speed versus sample integrity. Hot mounting is fast and creates a very hard mount, but the heat can alter the microstructure of certain alloys, such as some aluminum alloys or low-temperature tempers of steel.
The Problem of Shrinkage and Gaps
All mounting compounds shrink slightly as they cure. If the compound pulls away from the specimen, it creates a gap. This gap traps abrasive particles and fluids during polishing, which can contaminate the final surface and obscure the true microstructure. Low-shrinkage epoxies are vital for critical applications.
Hardness Mismatches
Ideally, the mounting compound should have a wear rate similar to the metal specimen. If the mount is too soft, it will wear away faster than the sample, causing the edges to round. If it is too hard, the specimen may be preferentially worn down.
Making the Right Choice for Your Goal
The decision between hot and cold mounting is dictated by the material's properties and your analytical needs.
- If your primary focus is high-throughput, routine analysis of robust materials (like steel): Hot compression mounting is the most efficient and economical choice.
- If you are analyzing heat-sensitive, coated, or delicate materials (like electronics or some polymers): Cold mounting is the only way to preserve the sample's true microstructure.
- If perfect edge retention is absolutely critical for failure analysis: Use a high-quality, low-shrinkage cold mounting epoxy or a fiber-filled hot mounting compound.
Ultimately, selecting the correct mounting technique is the foundational step that ensures the final microscopic image truly represents the material's internal structure.
Summary Table:
| Mounting Method | Process | Key Features | Best For |
|---|---|---|---|
| Hot Mounting | Heat + Pressure (150-200°C) | Fast (5-10 min), hard mount | Routine analysis of robust materials (e.g., steel) |
| Cold Mounting | Room temperature curing | No heat/pressure, gentle process | Delicate, heat-sensitive, or coated materials |
Achieve flawless microstructural analysis with the right mounting supplies from KINTEK.
Proper specimen mounting is the critical first step to revealing a material's true microstructure. Whether you need the speed of hot mounting presses or the gentleness of low-shrinkage epoxy resins for delicate samples, KINTEK has the reliable lab equipment and consumables to meet your metallography needs.
Let our experts help you select the perfect mounting solution for your lab. Contact us today to discuss your application and ensure accurate, repeatable results!
Visual Guide
Related Products
- Metallographic Specimen Mounting Machine for Laboratory Materials and Analysis
- Vacuum Cold Mounting Machine for Sample Preparation
- Customizable XRD Sample Holders for Diverse Research Applications
- Bomb Type Probe for Steelmaking Production Process
People Also Ask
- What are common techniques for metal deposition? A Guide to PVD, CVD, and Plating Methods
- What key indicators does a laboratory pressure testing machine measure? Essential T91 Alloy Steel Weld Testing
- What machine is used to press metal? Choose the Right Press for Your Application
- What method is widely used for mounting of specimens? Achieve Perfect Histological Slides with Proven Techniques
- How do you prepare soil for XRF sample? A Step-by-Step Guide to Accurate Analysis